
ESP32 + Redis + React: Build a Real-Time IoT System for Under $200 (Inspired by OpenLaneLink)
An SRE replaced a $120k bowling center system with $1,600 of ESP32s. This tutorial is inspired by it to build a complete real-time IoT system: ESPNow mesh, Redis pub/sub, WebSocket, React dashboard. Under $200.

ESP32 + Redis + React: Build a Real-Time IoT System for Under $200 (Inspired by OpenLaneLink)
An SRE replaced a $120k bowling center system with $1,600 of ESP32s. This tutorial is inspired by it to build a complete real-time IoT system, for under $200.
On July 19, 2026, a Show HN post made waves: an SRE named section33 replaced a bowling scoring system worth $120k with an ESP32-based equivalent for $1,600. The project, called OpenLaneLink, uses an ESPNow mesh architecture, Redis, and a React UI.
This tutorial is inspired by that architecture to build a generic real-time IoT system — ESP32 sensors, event streaming via Redis, React dashboard — for under $200.
The Inspiration: OpenLaneLink
The Challenge
The original scoring system (2008) cost $120k for 8 bowling lanes. It calculated ball speed, camera-based pin detection, managed animations and machines. A 1:1 replacement cost $80-120k, with no upgrades or service contracts.
The Solution
OpenLaneLink replaces everything with:
- ESP32 with ESPNow + RS485 fallback: ~$200 per lane pair
- Raspberry Pi as lane computer (Redis + state machine)
- React + WebSocket for UI and animations
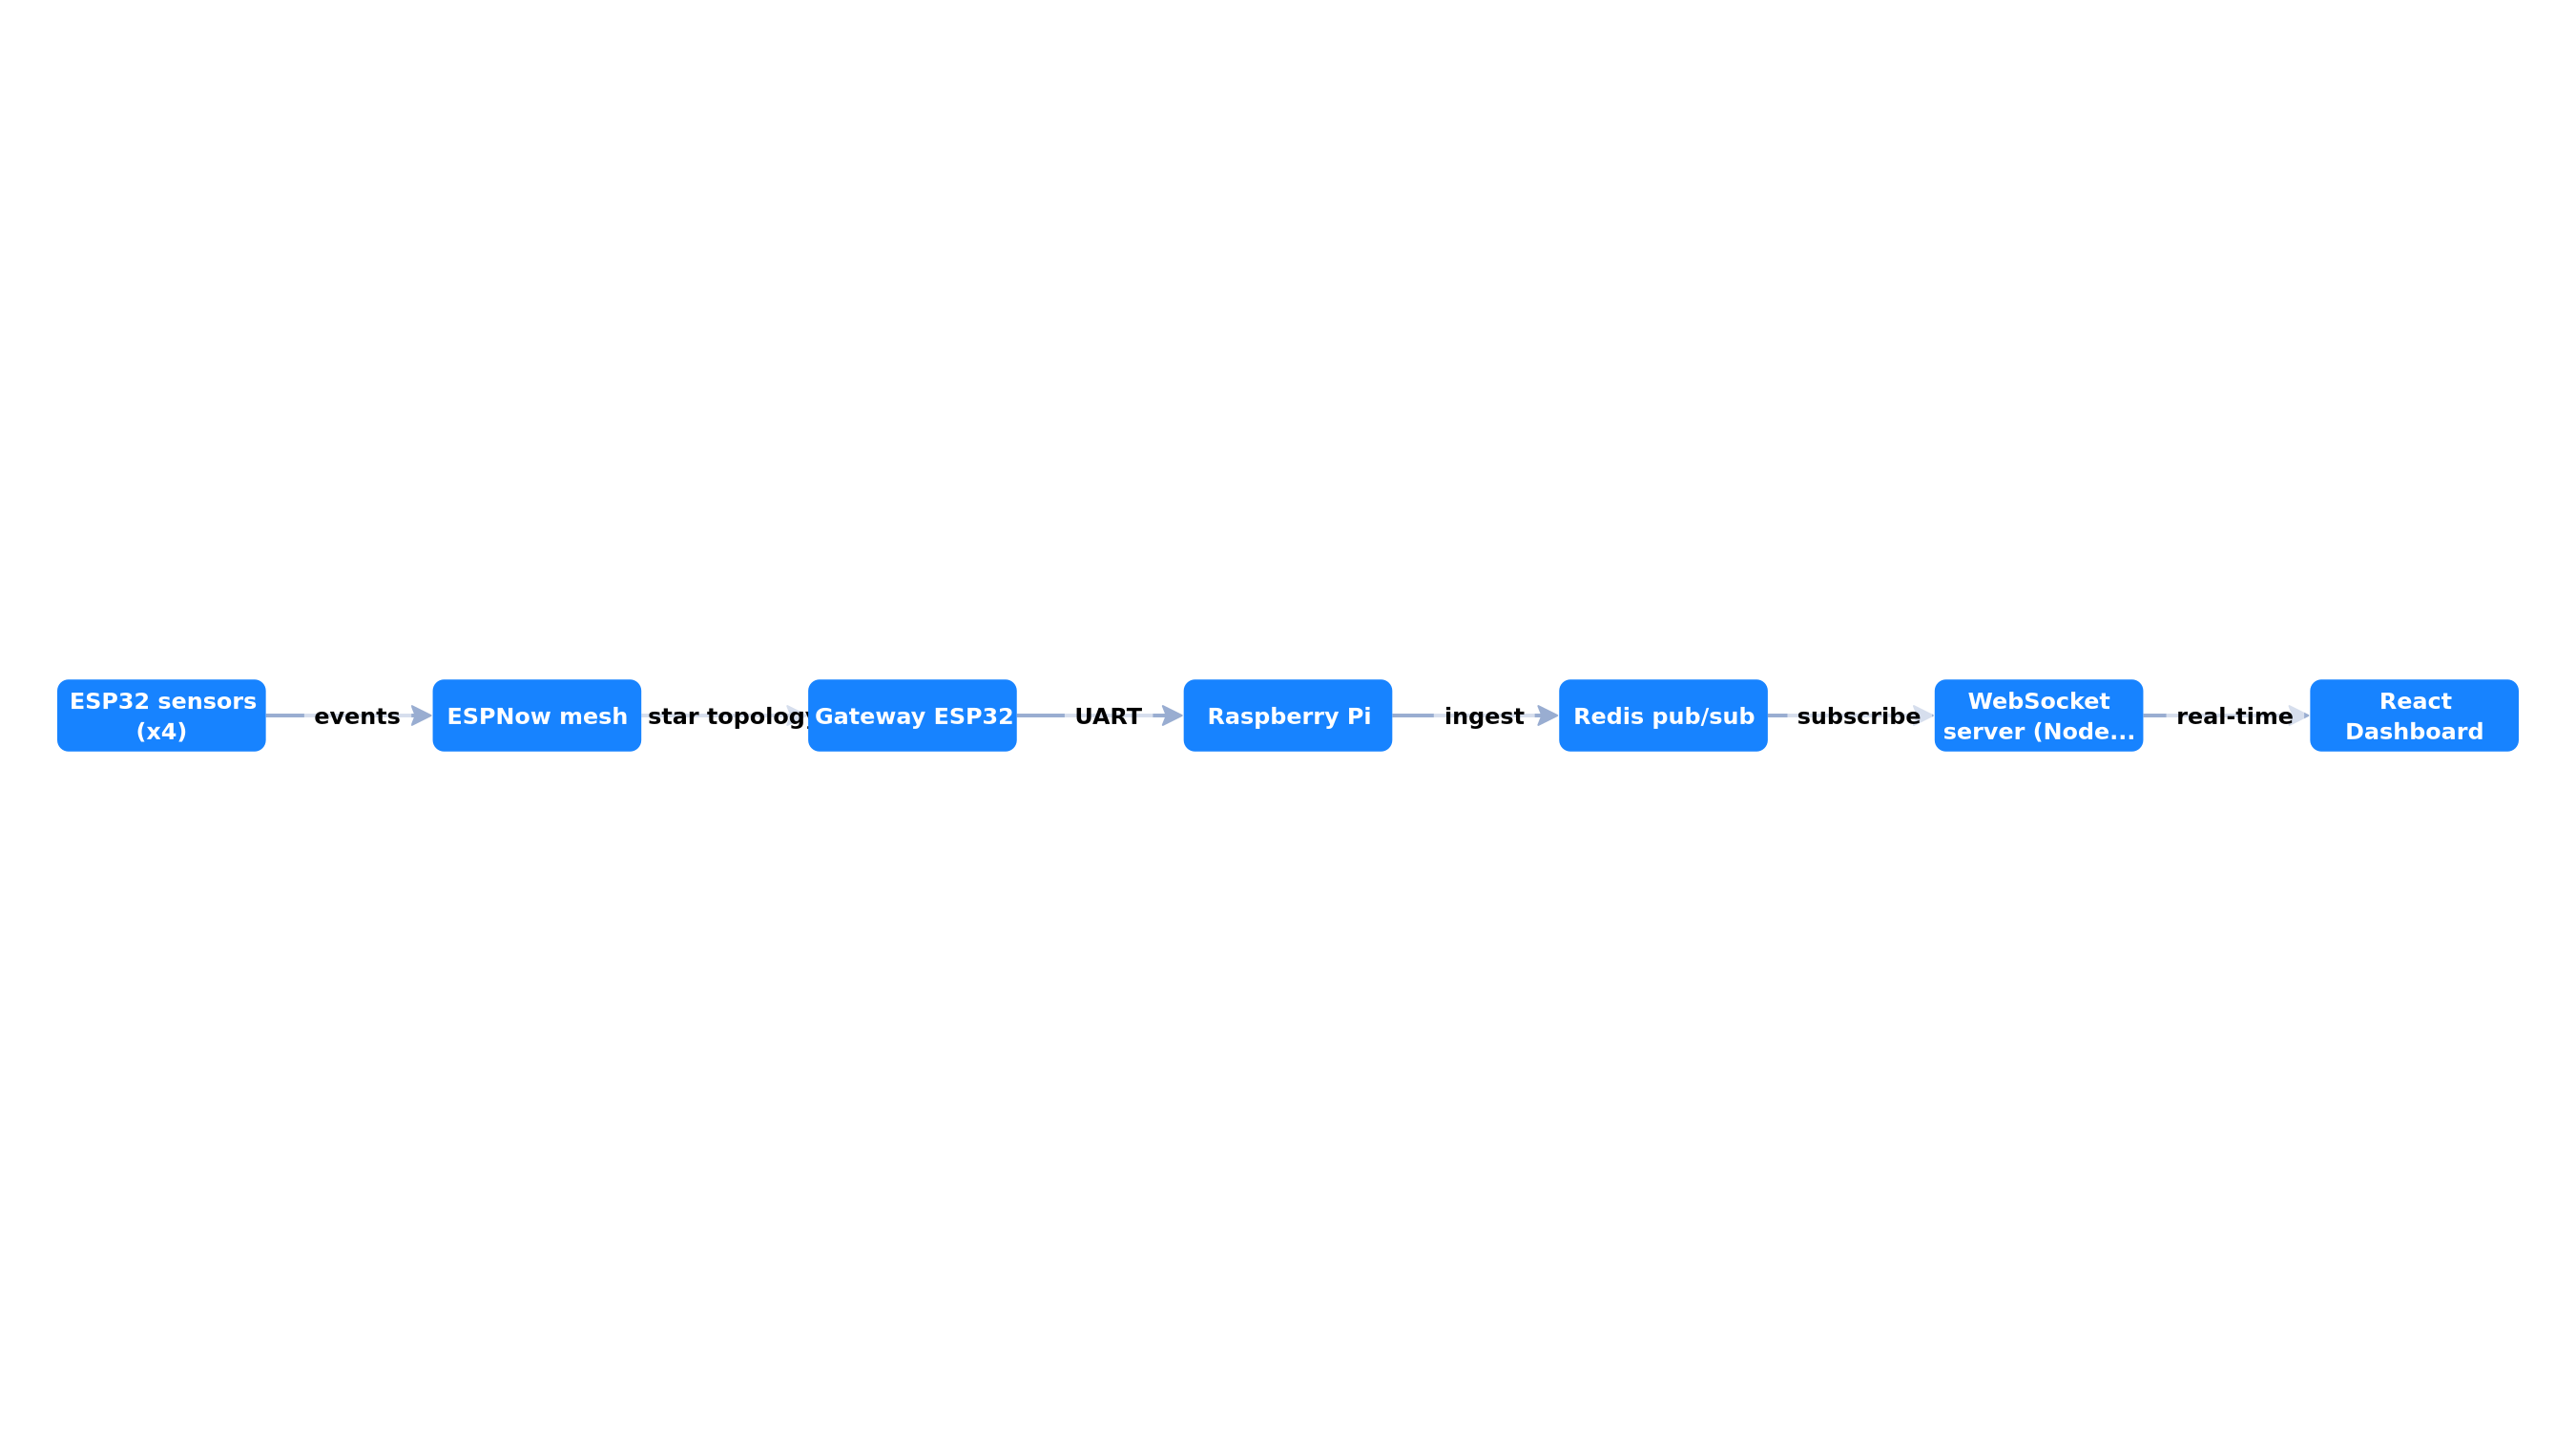 ESP32 + Redis + React architecture adapted from the OpenLaneLink project
Total cost: $1,600 instead of $120k, that's 75x cheaper.
The Real-Time IoT System Architecture
Components
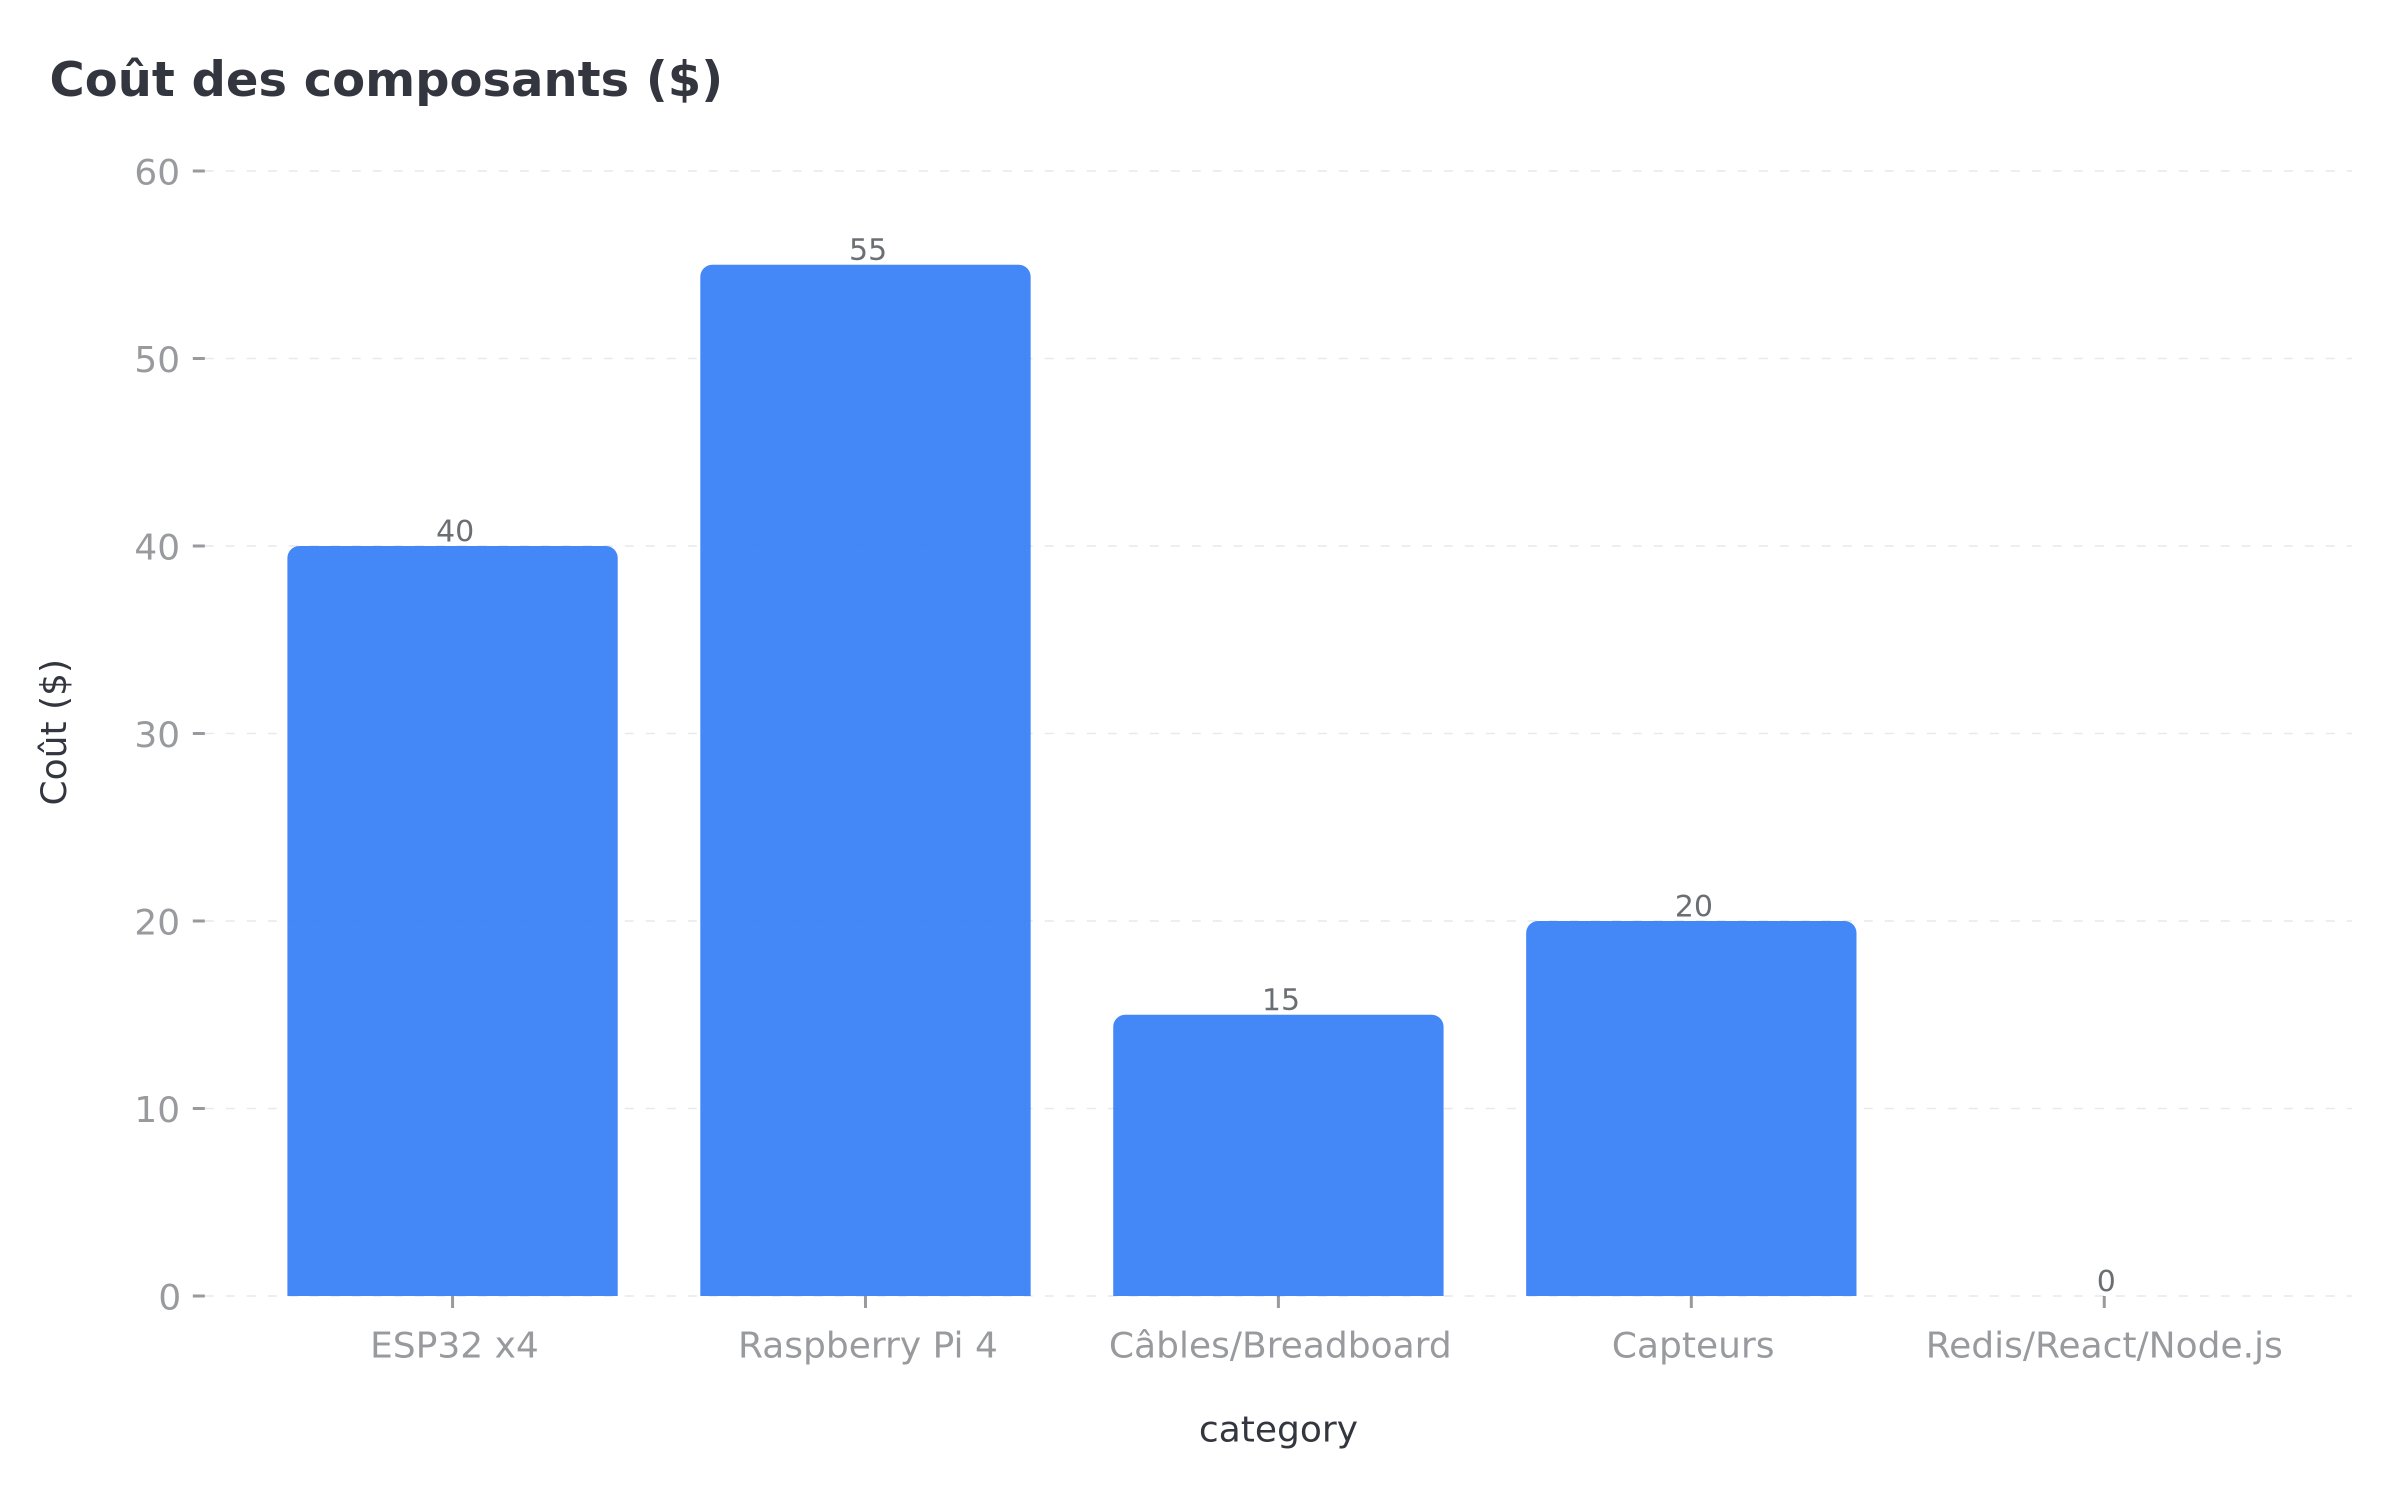 Cost breakdown per component of the ESP32 + Redis + React system
| Component | Role | Cost |
|---|---|---|
| ESP32 (x4) | Sensors and actuators | $40 |
| Raspberry Pi 4 | Lane computer + Redis | $55 |
| Redis (open source) | Pub/sub event streaming | $0 |
| Node.js | WebSocket server | $0 |
| React | Real-time dashboard | $0 |
| Cables and breadboard | Connections | $15 |
| Sensors (IR, temperature) | Inputs | $20 |
| Total | ~$130 |
The Data Pipeline
ESP32 → ESPNow mesh → Gateway ESP32 → Raspberry Pi (Redis)
  → WebSocket → React Dashboard
- ESP32 sensors: read values and emit events
- ESPNow mesh: nodes communicate in star-topology
- Gateway ESP32: connected to Raspberry Pi via UART
- Raspberry Pi: Redis receives events, pub/sub broadcasts them
- Node.js server: WebSocket bridge between Redis and clients
- React dashboard: displays data in real time
Step 1: ESP32 Firmware (ESPNow)
ESPNow Configuration
// esp32_sensor_node.ino
#include <esp_now.h>
#include <WiFi.h>

typedef struct struct_message {
  char node_id[16];
  float sensor_value;
  unsigned long timestamp;
} struct_message;

struct_message myData;

uint8_t gatewayAddress[] = {0xAA, 0xBB, 0xCC, 0xDD, 0xEE, 0xFF};

void setup() {
  Serial.begin(115200);
  WiFi.mode(WIFI_STA);

  if (esp_now_init() != ESP_OK) {
    Serial.println("Error initializing ESP-NOW");
    return;
  }

  esp_now_peer_info_t peerInfo;
  memcpy(peerInfo.peer_addr, gatewayAddress, 6);
  peerInfo.channel = 0;
  peerInfo.encrypt = false;

  if (esp_now_add_peer(&peerInfo) != ESP_OK) {
    Serial.println("Failed to add peer");
    return;
  }
}

void loop() {
  strcpy(myData.node_id, "sensor-01");
  myData.sensor_value = readSensor(); // Your sensor
  myData.timestamp = millis();

  esp_now_send(gatewayAddress, (uint8_t *)&myData, sizeof(myData));
  delay(1000); // 1Hz
}
RS485 Fallback
For noisy RF environments, add a wired RS485 fallback:
// RS485 fallback if ESPNow fails
if (esp_now_send(...) != ESP_OK) {
  sendRS485(myData); // Wired fallback
}
Step 2: Gateway ESP32 → Raspberry Pi
The ESP32 Gateway
The gateway receives ESPNow events and forwards them to the Raspberry Pi via UART:
// esp32_gateway.ino
void OnDataRecv(const uint8_t *mac, const uint8_t *incomingData, int len) {
  memcpy(&myData, incomingData, sizeof(myData));

  // Send to Raspberry Pi via UART
  Serial.print("EVENT:");
  Serial.print(myData.node_id);
  Serial.print(",");
  Serial.print(myData.sensor_value);
  Serial.print(",");
  Serial.println(myData.timestamp);
}
On the Raspberry Pi: Ingestion into Redis
# ingest.py
import serial
import redis
import json

r = redis.Redis(host='localhost', port=6379, db=0)
ser = serial.Serial('/dev/ttyUSB0', 115200)

while True:
    line = ser.readline().decode().strip()
    if line.startswith("EVENT:"):
        parts = line[6:].split(",")
        event = {
            "node_id": parts[0],
            "sensor_value": float(parts[1]),
            "timestamp": int(parts[2])
        }
        # Publish to Redis channel
        r.publish('sensor_events', json.dumps(event))
        # Store last state
        r.hset(f"node:{event['node_id']}", "last_value", event['sensor_value'])
Step 3: WebSocket Bridge (Node.js)
WebSocket Server
// server.js
const WebSocket = require('ws');
const redis = require('redis');

const wss = new WebSocket.Server({ port: 8080 });
const redisClient = redis.createClient();
const pubsub = redisClient.duplicate();

// When a client connects
wss.on('connection', (ws) => {
  console.log('Client connected');
});

// Subscribe to Redis events and broadcast to WebSocket clients
pubsub.subscribe('sensor_events');
pubsub.on('message', (channel, message) => {
  wss.clients.forEach((client) => {
    if (client.readyState === WebSocket.OPEN) {
      client.send(message);
    }
  });
});

console.log('WebSocket server running on :8080');
Step 4: React Real-Time Dashboard
Custom WebSocket Hook
// useSensorData.ts
import { useState, useEffect } from 'react';

interface SensorEvent {
  node_id: string;
  sensor_value: number;
  timestamp: number;
}

export function useSensorData(url: string) {
  const [events, setEvents] = useState<SensorEvent[]>([]);
  const [connected, setConnected] = useState(false);

  useEffect(() => {
    const ws = new WebSocket(url);

    ws.onopen = () => setConnected(true);
    ws.onclose = () => setConnected(false);

    ws.onmessage = (event) => {
      const data: SensorEvent = JSON.parse(event.data);
      setEvents(prev => [...prev.slice(-100), data]); // Keep last 100
    };

    return () => ws.close();
  }, [url]);

  return { events, connected };
}
Dashboard Component
// Dashboard.tsx
import { useSensorData } from './useSensorData';
import { LineChart, Line, XAxis, YAxis, Tooltip, ResponsiveContainer } from 'recharts';

export function Dashboard() {
  const { events, connected } = useSensorData('ws://localhost:8080');

  const chartData = events.map(e => ({
    time: new Date(e.timestamp).toLocaleTimeString(),
    value: e.sensor_value,
    node: e.node_id
  }));

  return (
    <div className="p-4">
      <div className="flex items-center gap-2 mb-4">
        <span className={`h-3 w-3 rounded-full ${connected ? 'bg-green-500' : 'bg-red-500'}`} />
        <span className="text-sm">{connected ? 'Connected' : 'Disconnected'}</span>
      </div>

      <ResponsiveContainer width="100%" height={400}>
        <LineChart data={chartData}>
          <XAxis dataKey="time" />
          <YAxis />
          <Tooltip />
          <Line type="monotone" dataKey="value" stroke="#3B82F6" strokeWidth={2} />
        </LineChart>
      </ResponsiveContainer>

      <div className="mt-4">
        <h3>Latest Event</h3>
        <pre>{JSON.stringify(events[events.length - 1], null, 2)}</pre>
      </div>
    </div>
  );
}
Step 5: Redis Pub/Sub and State Machine
The State Machine
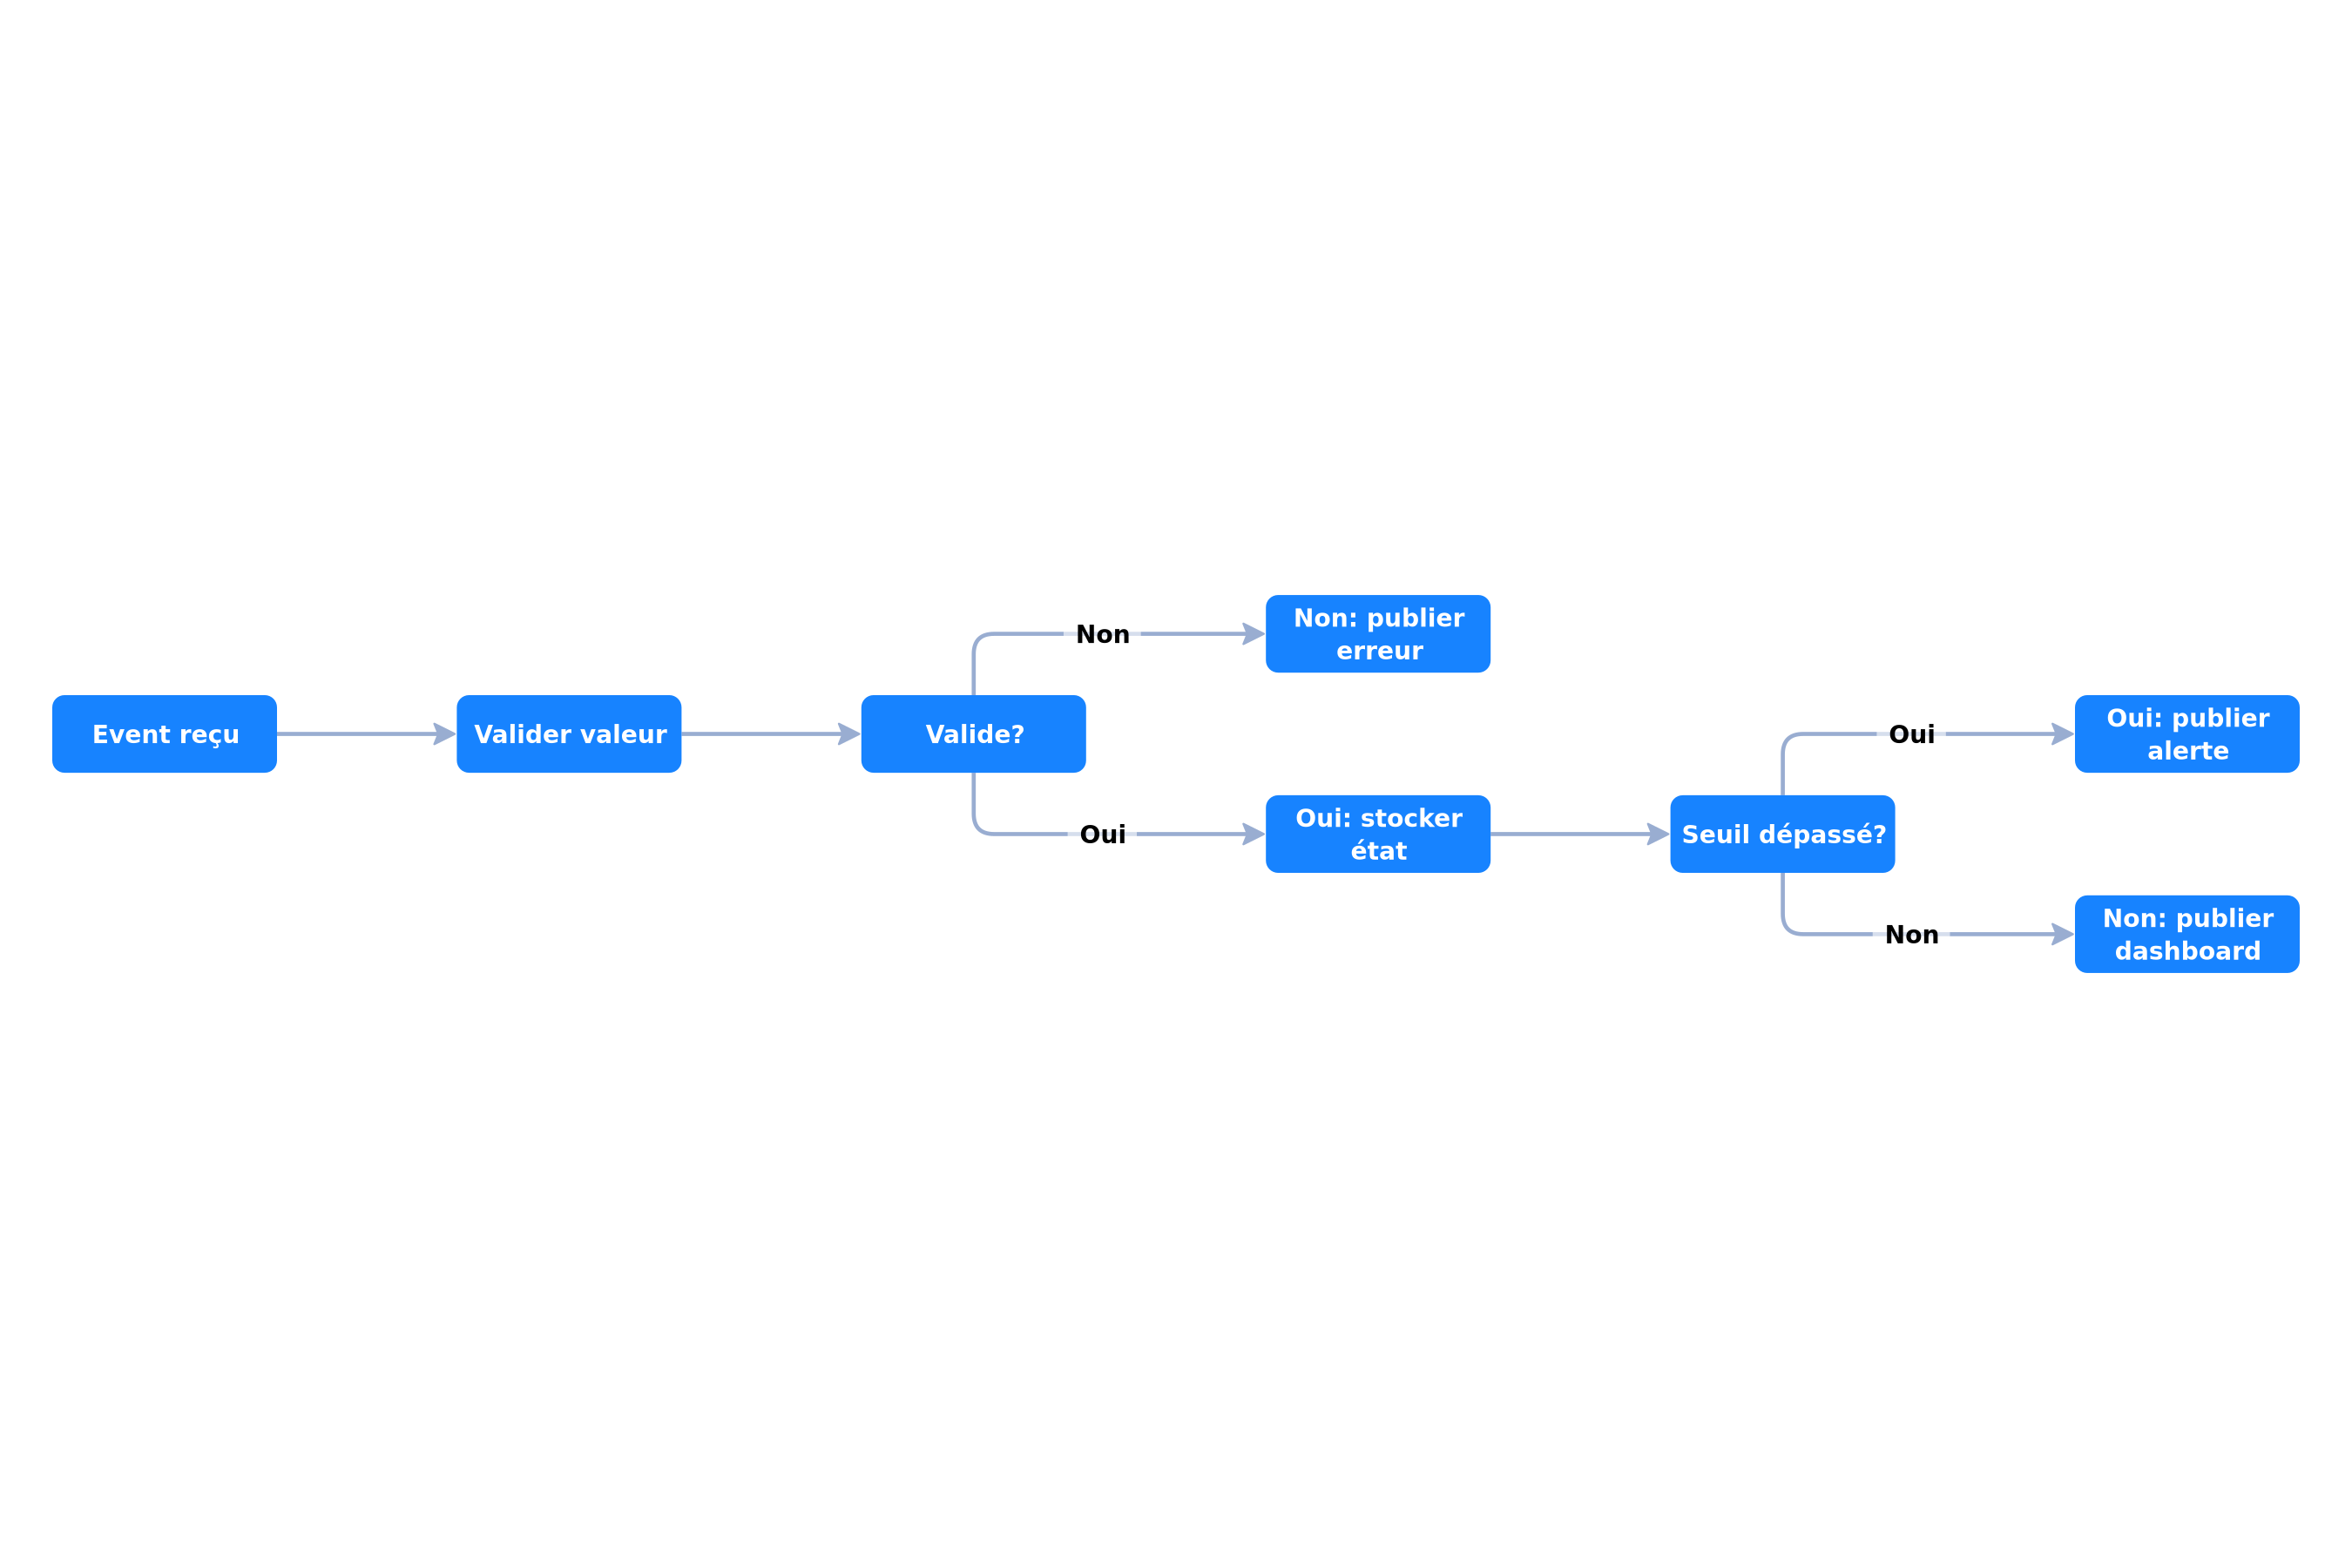 Redis state machine: ingestion, validation, broadcasting, and alerting
# state_machine.py
import redis
import json

r = redis.Redis(host='localhost', port=6379, db=0)

ALERT_THRESHOLD = 50.0

def process_event(event):
    node_id = event['node_id']
    value = event['sensor_value']

    # 1. Validate
    if value < 0 or value > 100:
        r.publish('errors', f"Invalid value: {value} from {node_id}")
        return

    # 2. Store state
    r.hset(f"node:{node_id}", mapping={
        "last_value": value,
        "last_seen": event['timestamp']
    })

    # 3. Check thresholds
    if value > ALERT_THRESHOLD:
        r.publish('alerts', json.dumps({
            "node_id": node_id,
            "value": value,
            "type": "threshold_exceeded"
        }))

    # 4. Publish for dashboard
    r.publish('sensor_events', json.dumps(event))
Communication Protocol Comparison
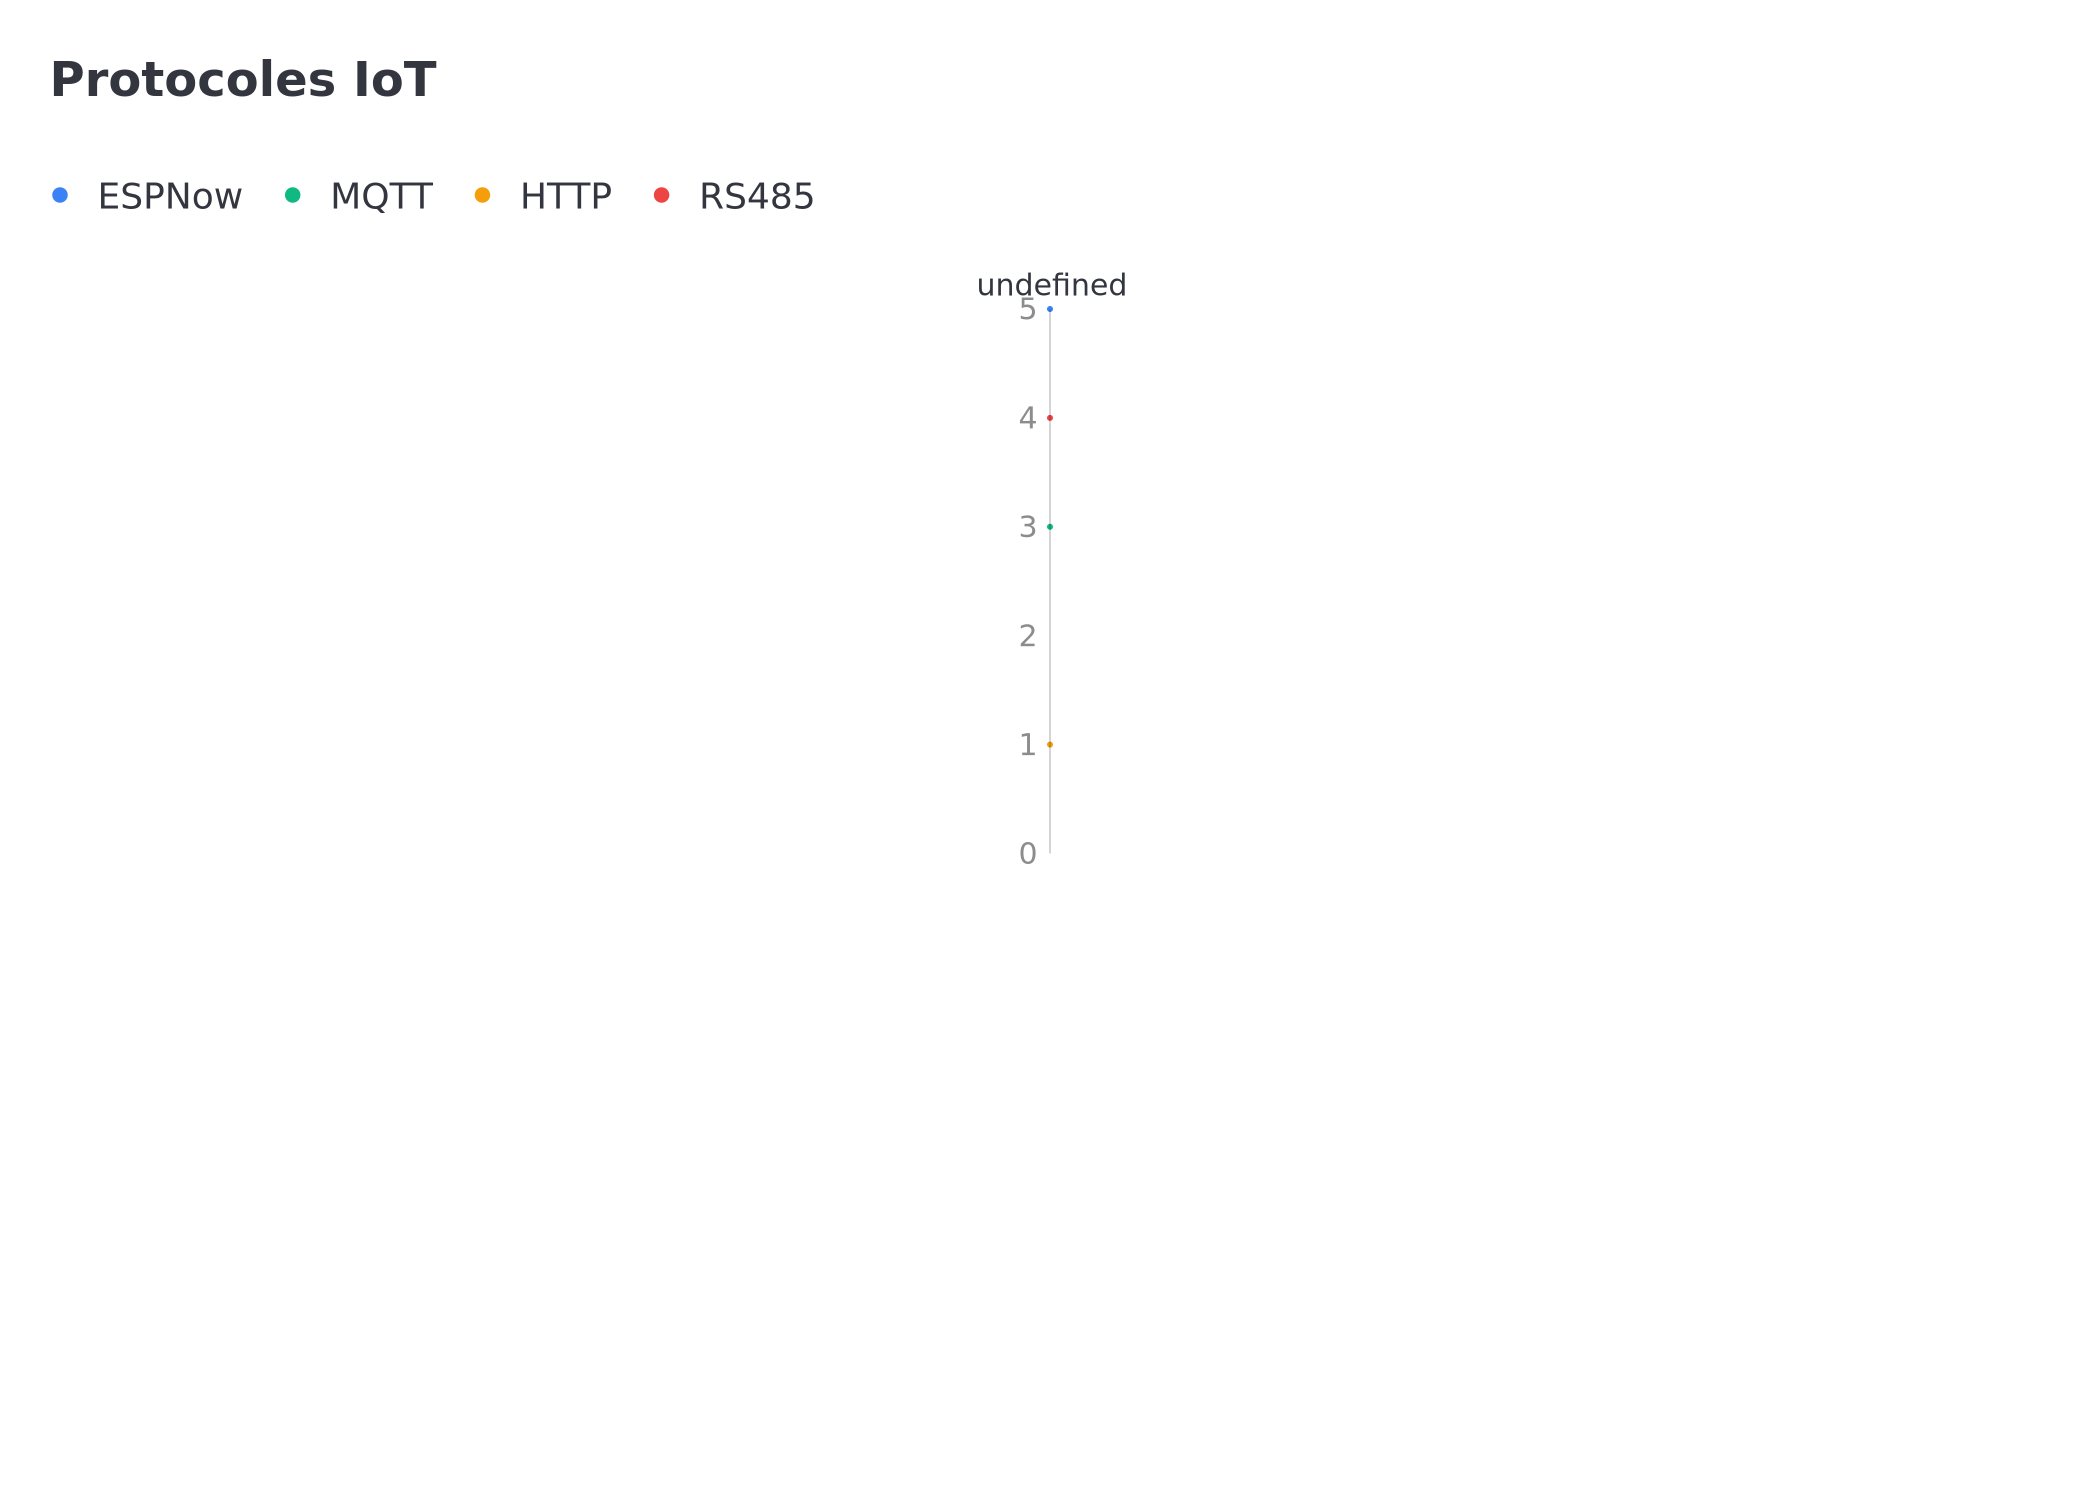 Radar comparison of IoT protocols: ESPNow, MQTT, HTTP, RS485
| Criterion | ESPNow | MQTT | HTTP | RS485 |
|---|---|---|---|---|
| Latency | Very low | Low | Medium | Low |
| Infrastructure | None | Broker required | Server required | Cable |
| Power consumption | Very low | Low | High | N/A |
| Range | ~200m | WiFi range | WiFi range | ~1km |
| RF reliability | Good | Good | Good | Excellent |
| Setup complexity | Simple | Medium | Simple | Medium |
Production Optimizations
1. WebSocket Reconnection with Exponential Backoff
// Backoff: 1s, 2s, 4s, 8s, 16s, 30s max
const reconnect = () => {
  let delay = Math.min(1000 * 2 ** attempts, 30000);
  setTimeout(() => connect(), delay);
  attempts++;
};
2. Rolling Buffer to Avoid Memory Overload
// Keep only the last 100 events
setEvents(prev => [...prev.slice(-100), data]);
3. Redis Persistence for Historical Data
# redis.conf
appendonly yes
appendfsync everysec
4. Monitoring with Redis Insights
# Start RedisInsights to visualize metrics
docker run -d -p 8001:8001 redislabs/redisinsight:latest
Deployment Checklist
- ESP32s flashed with ESPNow firmware
- Gateway ESP32 connected to Raspberry Pi via UART
- Redis installed and started on the Raspberry Pi
- Python ingestion script running
- Node.js WebSocket server started
- React dashboard built and served
- ESPNow connectivity test validated
- RS485 fallback tested (if applicable)
- WebSocket reconnection tested (kill/restart server)
- Redis Insights monitoring configured
Conclusion
The ESP32 + Redis + React architecture, inspired by the OpenLaneLink project, demonstrates that a real-time IoT system can be built for under $200 — versus proprietary solutions at $120k. Keys to success: ESPNow for mesh communication without infrastructure, Redis for sub-millisecond pub/sub, and React for a reactive dashboard.
For companies that want to explore IoT and automation, our web development service covers the React dashboard, and our automation accompaniment can integrate IoT data into your n8n workflows. If you want to discover how AI can integrate with your IoT, our AI agent creation service covers real-time analysis of sensor data.
Tags
FAQ
How much does a real-time IoT system based on ESP32, Redis, and React cost?
The complete system costs under $200: ~$10 per ESP32, a Raspberry Pi ($35-55) as lane computer, and the rest for Redis (free, open source) and React (free). The OpenLaneLink project that inspires this tutorial replaced a $120k system with $1,600.
What is ESPNow and why use it for IoT?
ESPNow is a wireless communication protocol from Espressif that allows ESP32s to communicate directly without a WiFi router. It's ideal for IoT because it offers low latency, low power consumption, and mesh topology.
Why use Redis in an ESP32 IoT system?
Redis is used for its pub/sub model which allows broadcasting sensor events to all connected clients in real time. Its in-memory speed (sub-millisecond) and simplicity make it the ideal choice for real-time IoT.
What's the difference between MQTT and ESPNow for ESP32s?
MQTT requires a central broker and WiFi connection, which adds latency. ESPNow allows direct communication between ESP32s without network infrastructure, with lower latency. RS485 can be used as a wired fallback for noisy RF environments.
Can the React dashboard be hosted on the same Raspberry Pi?
Yes. The Raspberry Pi can run Redis, the Node.js server (WebSocket), and serve the static React build. For production, it's recommended to separate the dashboard on a more powerful server or CDN.
Stuck on a step? We take it to production
Tutorials stop where production starts: secrets, GDPR, no-shows, CRM. A 30-min call to scope the delivery.
- 30 min
- Scoped delivery
- No commitment

Singbo Davy AGONMA
Fullstack Developer & AI Expert. n8n automation specialist, Laravel/Flutter development and AI agent integration. Master CS — IFRI.


