
n8n AI Agent Tutorial: Build Your First Autonomous Agent in 20 Minutes (2026)
Go from zero to a working AI agent in 20 minutes. This step-by-step n8n tutorial shows you how to build an autonomous agent that does web research and writes summaries — no Python, no coding experience needed.

Updated

Tutorial: Create Your First Autonomous AI Agent with n8n (Complete Guide 2026)
You've heard of AI agents and want to build your own? You are in the right place. Building an autonomous n8n AI agent has become accessible to everyone: no need to be a Python expert or write a single line of complex code. Thanks to n8n's AI Agent node, you visually assemble a brain (an LLM), tools, and memory, then let the system reason on its own to accomplish a goal.
In this tutorial, we will build a "Tech Watch Agent". Its mission: search for the latest news on a given topic, analyze it, and send us a concise summary on Slack or via Email. You'll walk away not just with an agent that runs, but above all with an understanding of what happens under the hood — the only way to build reliable agents next.
What is an autonomous n8n AI agent exactly?
Before touching a single node, let's set the foundation. The word "agent" is everywhere in 2026, often wrongly. An autonomous n8n AI agent is neither a simple chatbot nor a conditional workflow in disguise. It is a system that receives a goal (not a precise list of instructions), then decides on its own which steps to take to reach it.
This distinction is fundamental, because it changes how you design and debug your automation.
Autonomous agent vs traditional workflow: what's the difference?
A traditional n8n workflow is deterministic. You draw a path: "when an email arrives, extract the attachment, save it to Drive, notify Slack." Every run follows the exact same rail. If an unexpected situation arises, the workflow breaks or ignores the case. It's powerful, predictable, but rigid.
An autonomous agent is non-deterministic. You don't dictate the steps: you give it a goal and a toolbox. On each run, it can choose a different path based on what it observes. Ask it to "find this week's Next.js releases" and it will decide on its own that it needs to search the web, craft the query, read the results, and try again if they're insufficient. It's the difference between a script that executes and a system that thinks.
Autonomous agent vs chatbot: don't confuse them
A chatbot replies. You type, it answers, end of story. Even connected to an LLM, it stays passive: it generates text from its frozen knowledge.
An agent acts. It can call external tools, read an API, write to a database, send a message — then observe the result of its actions and adjust. A chatbot tells you "here's how to book a room." An agent actually books the room. This ability to act is what makes agents so useful… and what forces you to set guardrails, more on that later.
If you want to dig into the philosophy behind these systems before diving into practice, our article n8n AI Agent: transform your workflows into intelligent systems lays out the full conceptual framework.
What is the n8n AI Agent node made of?
The AI Agent node is the heart of the system. But on its own, it does nothing. Its power comes from what you plug into it. Think of it as a brain that needs organs to function. Three main inputs bring it to life.
1. The model (the brain). This is the LLM that reasons: GPT-4o, GPT-4o-mini, Claude 3.5 Sonnet, or an open-source model via Ollama. It's what "thinks," makes decisions, and writes the answers. Without a connected model, the agent can't start.
2. The tools (the hands). Each tool is a concrete capability: run a web search (Tavily), query Wikipedia, calculate, call an HTTP API, read a Google Sheet. The agent dynamically chooses which tool to use for the task. You can plug several into the same connector.
3. The memory (the context). By default, an agent forgets everything between two messages. Memory (Window Buffer Memory, for example) lets it remember the current exchange, essential for a coherent conversation.
On top of that comes the system prompt (the instructions), which defines its role, rules, and tone. The diagram below shows how these components articulate around the AI Agent node.
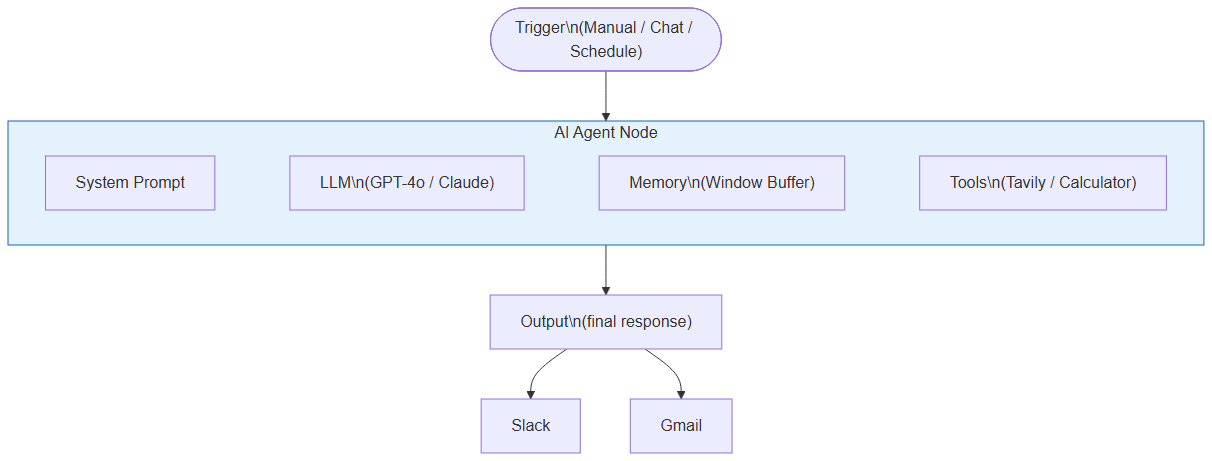 Diagram of n8n AI Agent node components: LLM model, system prompt, memory, and connected tools
How does an AI agent's reasoning loop work?
Here is the most important concept in this entire tutorial. An agent doesn't answer in a single pass: it loops. This cycle, often called ReAct (Reasoning + Acting), is what makes it autonomous. Understanding this loop means understanding why an agent succeeds where a chatbot fails.
On each turn, the agent chains four phases. Perception: it reads the goal and the memorized context. Decision: it chooses the next action — call a tool, or answer directly if it knows enough. Action: it executes the chosen tool with the right parameters. Observation: it reads the raw result returned by the tool. Then it starts again, integrating this new information, until it judges it has reached its goal.
Concretely, if you ask "what are the latest Next.js features?", the agent perceives that this is recent info it doesn't know, decides to use web search, acts by firing a query to Tavily, observes the returned articles, then evaluates: "do I have enough?". If yes, it writes the summary; if not, it runs a more precise search. This back-and-forth is invisible to the end user, but visible in n8n's execution view.
 The ReAct reasoning loop: the agent alternates decisions and tool calls until it reaches its goal
This loop has a direct consequence: an agent can make several calls to the LLM and tools for a single request. That's more expensive than a single call, and it's exactly why guardrails (iteration limits, token budget) are essential in production.
Prerequisites
- An n8n account (Cloud or Self-hosted version 1.65+). If you're starting from scratch self-hosting, first follow our n8n installation guide with Docker (2026).
- An OpenAI API key (or Anthropic).
- (Optional) A Tavily or SerpApi API key for web search (Tavily offers a generous free version).
What are the steps to build an autonomous n8n AI agent?
Here's the overview of the journey we'll follow. Keep this diagram in mind: each step below maps to a block of the flow.
 Full journey: create the workflow, connect the model, wire the tools, write the prompt, add memory, test, set guardrails, and connect the output
Step 1: Create the workflow and add the AI Agent node
- Open your n8n editor and create a new workflow.
- Add a trigger node. For this test, use the "Chat Trigger" node (if you want to chat with it) or "Manual Trigger". Let's say "Manual Trigger" to start.
- Search for and add the "AI Agent" node.
This is the heart of our system. Double-click on it to configure it. At this stage, the node shows empty connectors beneath it: that's where the model, the tools, and the memory will plug in.
Step 2: Configure the brain (the model)
The agent needs a brain.
- In the AI Agent node inputs, you will see a connector for "Chat Model".
- Add an "OpenAI Chat Model" node and connect it to the agent's "Chat Model" input.
- Configure your OpenAI credentials.
- Select the model: GPT-4o or GPT-4o-mini (faster and cheaper, often enough for tech watch).
Practical tip: start with gpt-4o-mini. It reasons very well on tool tasks and costs a fraction of the full model. You'll switch to gpt-4o or Claude only if you hit reasoning limits on complex tasks.
Step 3: Give tools to the agent
This is where the magic happens. Without tools, AI can only talk. With tools, it can act.
- In the AI Agent node inputs, locate the "Tool" connector.
- We will add a search tool. Search for the "Tavily" node (or an "HTTP Request" tool configured for a search API if you prefer). Connect it to the "Tool" input.
- (Optional) Add a "Calculator" tool if you want it to do math, or a "Wikipedia" tool.
Note: You can connect multiple tools to the same "Tool" connector. The agent will choose the one it needs.
How do you describe a tool so the agent uses it?
A crucial point that's often overlooked: the agent chooses its tools solely from their description. If the description is vague, it won't know when to call it. Be explicit. For a custom HTTP tool, write a description like: "Use this tool to fetch the current price of a cryptocurrency. Expected input: the symbol, e.g. BTC." A good description is often worth more than a better model.
Beyond native tools, you can connect your agent to standardized external services via the MCP protocol. Our guide connect n8n to an MCP server for your AI agents details this approach, which multiplies the agent's capabilities without re-coding each integration.
Step 4: Define the system prompt
Go back to the AI Agent node configuration. In the "System Message" or "Instructions" field, you give the agent its personality, mission, and rules. This is probably the most underrated lever: a good prompt turns an erratic agent into a reliable assistant.
Here's an example of a professional system prompt, more robust than the bare minimum:
# Role
You are a senior tech-watch assistant for a product team.

# Goal
Find PRECISE and RECENT information on the requested topic,
then produce an actionable summary in under 200 words.

# Rules
- Always use the search tool before answering: never answer
  from memory about current news.
- Only cite information you can source from the results.
- If results are contradictory or insufficient, run ONE more
  precise search, then flag the uncertainty instead of inventing.
- Never invent a date, a number, or a version name.

# Output format
- One synthesis sentence.
- 3 to 5 factual bullets, each with its source.
- Write in English, neutral and professional tone.
Notice the structure: a role, a measurable goal, negative rules ("never invent"), and an imposed output format. These four blocks drastically reduce hallucinations and make answers predictable. Simplified example: adapt the rules to your real use case.
Step 5: Add conversational memory
If you use a Chat Trigger to talk with your agent, add memory, otherwise it will forget your previous message on each turn.
- Locate the "Memory" connector under the AI Agent node.
- Add a "Simple Memory" (Window Buffer Memory) node.
- Set the window (the number of messages retained): 5 to 10 is usually enough.
Memory keeps the latest exchanges and re-injects them into the context on each call. Be careful: the larger the window, the more tokens each call consumes. For a one-off task (triggered manually or on a schedule), memory is optional; for a conversational assistant, it's essential.
Step 6: Test the agent and watch its reasoning
- If you're not using the Chat Trigger, add an "Edit Fields" (Set) node before the agent to define your question. Create a field
chatInputwith the value: "What are the latest Next.js features released this week?". - Execute the workflow.
What will happen (watch the execution view):
- The agent receives the question.
- It "thinks" and sees that it doesn't know the answer by heart because it is recent.
- It decides to use the Tavily tool.
- It generates an optimized search query.
- Tavily returns the results.
- The agent reads the results, synthesizes them, and generates the final answer.
The most instructive part is to click on the AI Agent node after execution to expand the loop "logs": you'll see each thought, each tool call, and each observation. It's your best debugging tool.
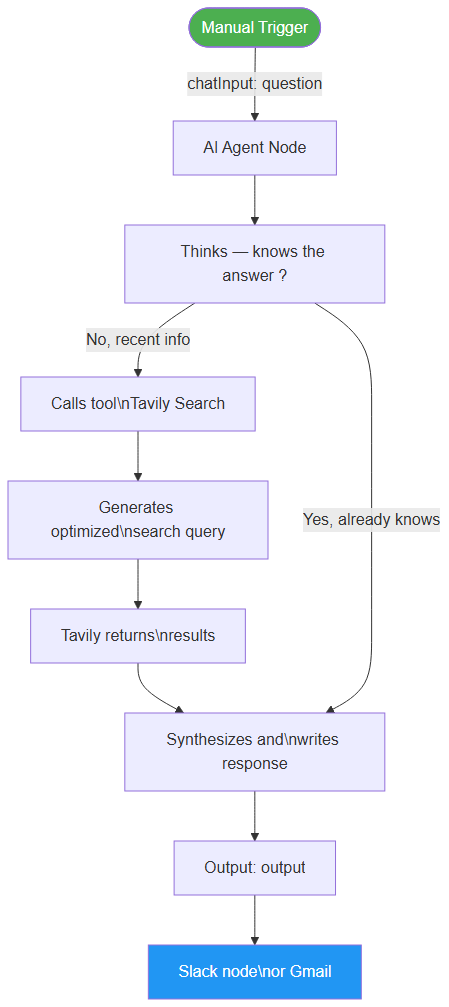 How the n8n AI agent reasons, calls the Tavily Search tool, and generates a synthesized response
Step 7: Connect the output (Slack/Email)
Once the agent has generated its response (output of the AI Agent node), you can add a "Slack" or "Gmail" node. Use the agent's output variable (usually output) as the message content:
{{ $json.output }}
Wire this field into the Slack message body or the email, and your agent now delivers its summaries right where your team works.
How do you set guardrails on an autonomous AI agent?
This is the step that "5-minute" tutorials forget, and it's precisely the one that separates a gadget from a production system. An autonomous agent, by definition, makes decisions on its own. Without a framework, it can loop forever, burn through your token budget, or — worse — execute an irreversible action on bad data.
Three families of guardrails are worth knowing.
Limit iterations. The AI Agent node exposes a "Max Iterations" parameter. Set it (for example to 5 or 10). Beyond that, the agent stops instead of running indefinitely. It's your first line of defense against infinite loops.
Validate sensitive actions. Any irreversible action — emailing a client, making a payment, deleting a record — should go through human validation. In practice, you insert an approval step (for example a Slack message with buttons, or the human-in-the-loop node) before the critical action. The agent prepares, the human confirms.
Control costs. Each iteration consumes tokens. Monitor your usage on the OpenAI/Anthropic side, set spending limits on your API key, and favor a cheap model for simple tasks. A poorly framed agent can turn a one-cent task into a multi-euro bill if the loop runs away.
The diagram below sums up the decision logic to wire around your agent in production.
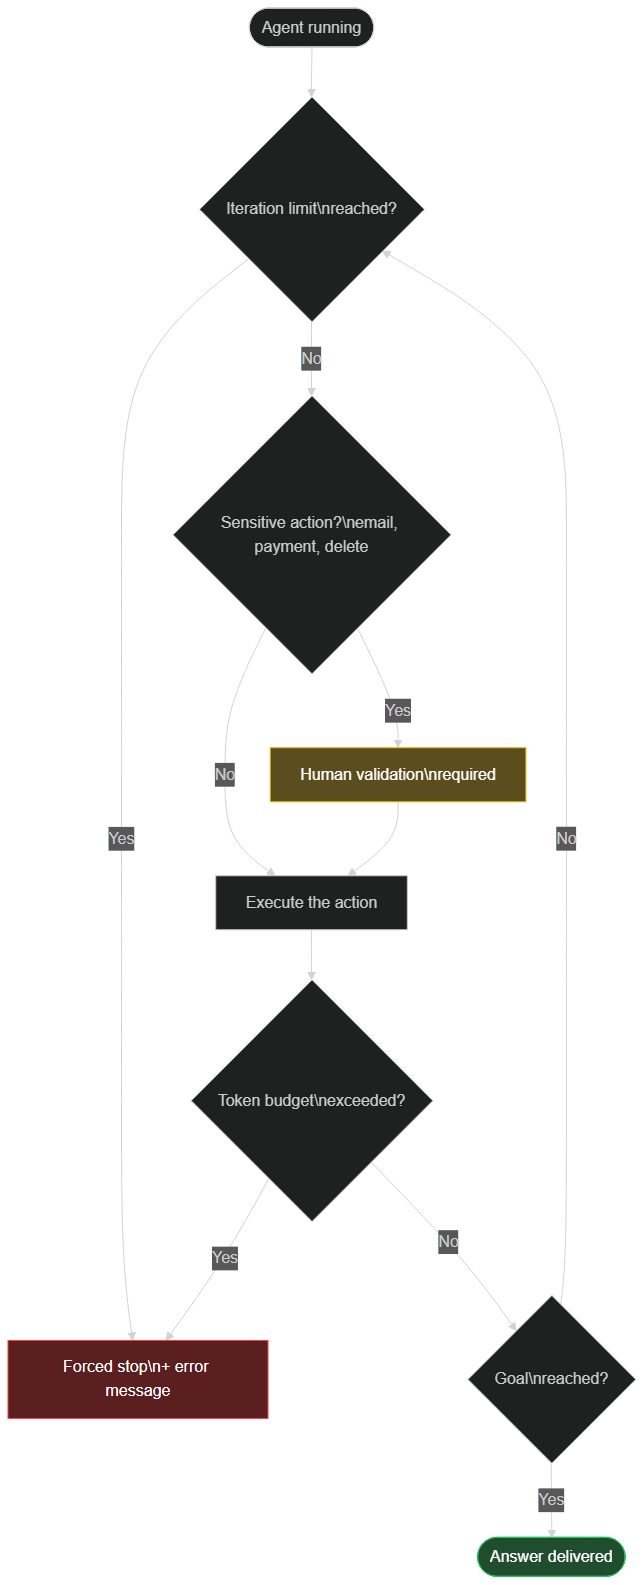 Autonomous agent guardrails: iteration limit, human validation, and cost control before each action
How do you debug an n8n AI agent that doesn't work?
Even well built, an agent can behave unexpectedly. Here are the most common failures and how to fix them.
The agent never uses its tools. Nine times out of ten, the problem is the descriptions. The model only "sees" the tool description; if it's fuzzy, it prefers to answer from memory. Rewrite precise descriptions oriented around "when to use this tool".
The agent invents information (hallucinations). Strengthen the system prompt with explicit negative rules ("never invent a date or a number") and force the use of a search tool before any factual claim. Lowering the model's "temperature" also helps make it more factual.
The agent loops or takes too long. Check the "Max Iterations" limit and the clarity of the goal. A vague goal ("help me") pushes the agent to fumble. A precise goal ("summarize this week's Next.js releases in 5 bullets") guides it.
Authentication error on a tool. APIs often return 401/403 when the key is misconfigured. Test the tool in isolation (running it alone in a test workflow) before attaching it to the agent.
If your self-hosted instance itself is the problem (startup errors, a container that won't stay up), go back to our n8n installation guide with Docker to validate your technical foundation.
What are concrete use cases for an autonomous n8n AI agent?
Once you've mastered the mechanics, the applications are many. Here are cases teams actually put in place with n8n.
Automatic watch and summary. This is our example: the agent monitors a topic, competitors, or a keyword, then delivers a daily digest on Slack. Ideal for staying informed without spending your mornings on it.
First-line customer support. Connected to your knowledge base and ticketing tools, an agent can qualify a request, find the answer, and either reply or escalate to a human with a context summary.
Lead sorting and routing. The agent reads an incoming form, enriches the record (web search on the company), scores the lead, and routes it to the right sales rep with a synthetic note.
Internal research assistant. Plugged into Notion, Google Drive, and your business APIs, it answers the team's questions by fetching info at the source, rather than guessing.
These scenarios show that an agent's value doesn't come from the LLM alone, but from the combination of LLM + tools + business data. To gauge what that can represent at a team scale, read how we automated 40 hours of work per week with AI agents.
When should you NOT use an autonomous AI agent?
As appealing as they are, agents are not the answer to everything. Knowing when to avoid them will save you unnecessary cost and unpredictable behavior. The rule is simple: if the task is deterministic, a classic workflow is better.
Take an example. "When a Stripe payment succeeds, add the customer to the database and send a welcome email." Here, the path is fixed, known in advance, unambiguous. Handing this to an autonomous agent would be a mistake: you'd pay for LLM calls for logic that a simple chain of nodes runs for free, faster, and 100% predictably. The agent would introduce non-determinism right where you want reliability.
Conversely, the agent shines when the task requires judgment: interpreting a vague request, choosing among several sources, synthesizing, or adapting to variable inputs. If you can draw the full flowchart in advance, don't use an agent. If you can't — because the steps depend on the content encountered — then the agent makes full sense.
A good practice, in fact, is to mix the two: a deterministic workflow for the skeleton (triggers, validations, database writes), and an AI Agent node only for the block that requires reasoning. That way you keep predictability where it counts and intelligence where it adds value. This is often the most robust and most cost-effective architecture in production.
How much does an autonomous n8n AI agent really cost?
n8n is free to self-host (open-source) and offers a trial cloud plan; the real cost driver is the LLM calls. Because an agent loops, one request can trigger several calls to the model. At the scale of our tech-watch agent, and based on public OpenAI/Anthropic pricing as of mid-2026, a typical run with gpt-4o-mini stays in the order of a few cents; switching to a premium model can multiply that cost several times.
Three levers keep the bill under control: pick the cheapest model that does the job, cap the number of iterations, and reduce the size of the memory injected on each call. Always check the current pricing in your provider's official documentation before scaling up — it changes regularly.
n8n or Make for your AI agents: which should you choose?
If you're still hesitating on the platform, know that Make also offers an AI-agents approach, with a different philosophy. n8n shines through self-hosting, its native AI Agent node, and its open-source ecosystem; Make appeals with its simplicity and catalog of turnkey integrations. The right choice depends on your need for control, budget, and technical skills. Our detailed comparison Make AI Agents vs n8n: which to choose in 2026 helps you decide without going wrong.
What are the next challenges to tackle with your n8n AI agent?
Congratulations! You have just created an autonomous agent. It's not just a script that searches Google; it's an AI that understood your need and used a tool to answer it, looping until it reached its goal.
To go further:
- Give it more powerful tools: access to your Notion, your Google Calendar, or the ability to send HTTP requests to your own APIs.
- Chain several specialized agents (one that searches, one that writes, one that verifies) for more complex tasks.
- Industrialize your guardrails and monitoring before any move to production.
Automation with n8n is now limited only by your imagination — and your rigor. Ready to go further? Discover how we automated 40 hours of work per week with AI agents — a real-world case of what you just set up.
Tags
FAQ
Do I need coding experience to create an AI agent with n8n?
No, you don't need any coding experience. n8n uses a visual drag-and-drop interface that lets you build AI agents without writing Python or any complex code. This tutorial is designed for complete beginners.
How long does it take to build a first n8n AI agent?
With this step-by-step tutorial, you can have your first autonomous AI agent up and running in approximately 20 minutes. The tutorial covers account setup, connecting an LLM (GPT-4o or Claude), and wiring search tools together.
Which AI model should I use with n8n for my first agent?
For beginners, GPT-4o from OpenAI or Claude 3.5 Sonnet from Anthropic are the best options. Both offer excellent reasoning capabilities and have free trial credits. n8n supports both natively through its AI Agent node.
What can an n8n AI agent do automatically?
An n8n AI agent can browse the web for information, send emails, update spreadsheets, post to Slack, query databases, process documents, and make decisions based on data — all without human intervention. The agent decides which tools to use based on the task.
Is n8n free to use for AI agents?
n8n offers a free cloud plan and is fully open-source, so you can self-host it for free. The AI Agent node is available on all plans. You'll only pay for the LLM API calls (OpenAI/Anthropic), which cost a few cents per run.
What is the difference between an n8n workflow and an n8n AI agent?
A traditional n8n workflow follows a fixed linear path: 'if X, do Y'. An n8n AI agent is autonomous — it reasons about the goal, selects the right tools, executes actions, evaluates results, and adapts its plan dynamically. It's the difference between a script and a thinking system.
How do I limit the cost and risk of an autonomous AI agent?
Set guardrails: cap the agent's maximum number of iterations, use a cheaper model (GPT-4o-mini) for simple tasks, add human validation before any sensitive action (sending email, payments, deletions), and monitor token usage. These protections prevent infinite loops and surprise bills.
Ready to implement this?
Book a free 30-min strategy call with our experts
We'll analyze your situation and propose a concrete action plan.
William Aklamavo
Web development and automation expert, passionate about technological innovation and digital entrepreneurship.


