
Build an MCP Server in TypeScript in 30 Min — Complete 2026 Tutorial
The Model Context Protocol (MCP) lets AI agents access your private data. Step-by-step: install the SDK, write your first tool, connect to Cursor. From zero to working server in 30 minutes.

Updated

How to Build an MCP Server in TypeScript in 30 Minutes
The Model Context Protocol (MCP) is the emerging standard that allows AI agents (Claude, Cursor, GPT-5) to access your proprietary data and systems in a secure, structured way. If you've ever wanted your AI agent to consult your CRM, your database or your internal documentation — that's exactly what MCP makes possible. In this tutorial, you'll learn how to build a complete MCP server in TypeScript, from installing the official SDK to connecting to a real client like Cursor.
The goal is deliberately concrete: by the end, you'll have a working server exposing tools, resources and prompts, testable with the official inspector, and ready to be secured for production. Expect about 30 minutes for the basic version, a bit more if you explore the advanced sections.
What Is the Model Context Protocol (MCP) and Why Use It?
MCP is an open, standardized protocol that describes how a language model accesses external tools and data. Before MCP, every integration between an AI agent and a system (CRM, SQL database, in-house API) was a custom build, not reusable from one agent to another. MCP solves this by enforcing a common contract: a client (the host that runs the LLM) always knows how to query a server the same way, regardless of the vendor.
The clearest analogy is the USB-C port: instead of a proprietary cable per device, a universal connector. MCP plays this role for AI agents. You write your logic once on the server side, and every compatible client (Cursor, Claude Desktop, n8n, and others) can plug into it without rewriting anything.
How Is an MCP Server Structured: Client, Server and Transport?
The MCP architecture relies on three clearly separated roles. The client (also called the host) is the application that contains the LLM and orchestrates the conversation. The server exposes capabilities: tools, resources, prompts. The transport is the communication channel between them, using the JSON-RPC 2.0 message format.
 The AI client talks to the MCP server through a transport (stdio or HTTP). The server exposes tools, resources and prompts wired to your systems.
This separation is the key to portability. Your server doesn't know — and doesn't need to know — which model is querying it. It simply answers protocol requests: "what are your capabilities?", "list your tools", "run this tool with these arguments". The client takes care of presenting the results to the LLM.
Why MCP Rather Than a Simple REST API?
The legitimate question: why not simply connect the AI agent to your existing REST API?
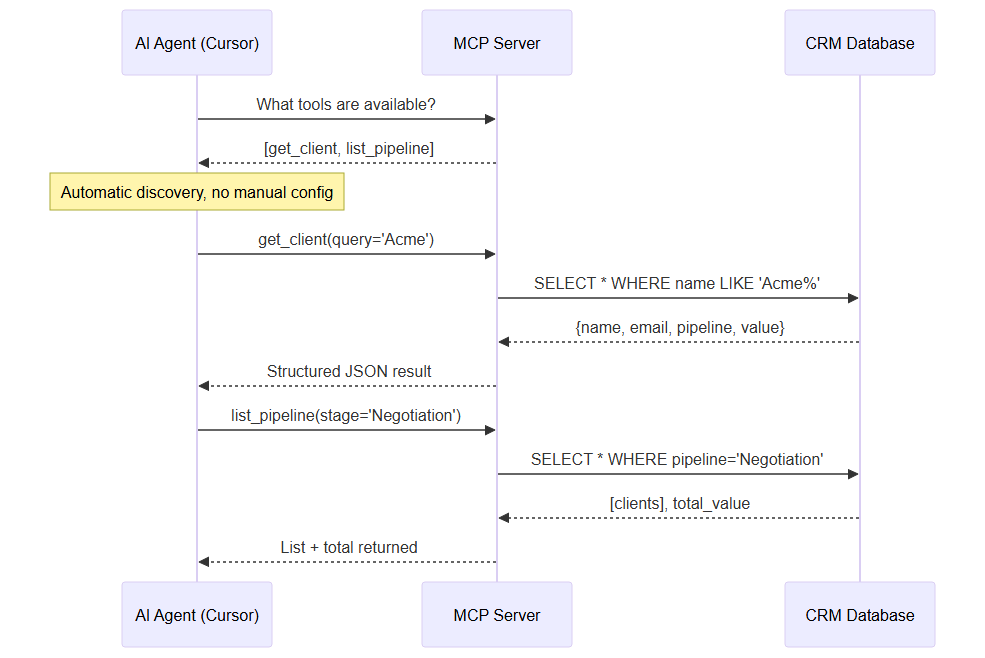 The AI agent queries the MCP server to discover available tools, then calls them directly
The fundamental difference: MCP is a tool discovery protocol. The AI agent can ask your MCP server "what tools do you have available?" and receives a structured list with descriptions, parameters and types. The agent then understands what to do with these tools without manual configuration on your side.
With a classic REST API, you need to explain to the agent how to use it in every prompt: which route to call, which body format, which headers. With MCP, you do it once in the code, as typed schemas, and every agent connecting to your server automatically understands. This self-description is what changes everything: less fragile prompt engineering, more reliability.
Under the hood, MCP relies on JSON-RPC 2.0, a simple and proven message format. Concretely, three message types flow through: requests (the client asks for something and waits for a response), responses (the server returns a result or an error), and notifications (one-way messages, no response expected). You'll almost never write this JSON by hand: the SDK serializes and deserializes it for you. But knowing the protocol is standardized helps you understand why the same server works interchangeably with Cursor, Claude Desktop or a home-grown client.
How Does the LLM Choose Which Tool to Call?
This is a common question, because the mechanism is less magical than it seems. When the client connects, it fetches the list of tools with their descriptions and schemas, then injects this information into the model's context. During a conversation, if the user's request matches an available tool, the LLM emits a structured tool call — exactly like the "function calling" you may already know. The client intercepts this call, forwards it to your MCP server, retrieves the result, and re-injects it into the context so the model can craft its final answer. Your job on the server side is therefore mostly to name and describe your tools well: this text is what guides the model's decision.
What Are Concrete Use Cases for an MCP Server?
Before diving into code, let's anchor the value with real examples. An MCP server shines whenever an AI agent needs to interact with your data rather than its general knowledge alone.
- Sales assistant: an agent that consults your CRM in real time to answer "which prospects are in negotiation and for how much?" without you having to copy-paste excerpts.
- Augmented technical support: a
search_documentationtool that queries your Notion or Confluence base to provide sourced, up-to-date answers, without hallucination. - Internal operations: expose
create_ticket,assign_taskorcheck_stocktools so the agent actually acts on your systems, not just chats. - On-demand reporting: a tool that aggregates metrics (sales, performance, finance) and returns a summary the model formats.
The common thread of these use cases: the data lives with you, the intelligence lives in the model, and MCP bridges them cleanly and reusably. You only write the integration once.
What Are the Prerequisites to Build an MCP Server in TypeScript?
Before coding, make sure you have the minimal environment. Nothing exotic: if you already do Node, you're ready.
- Node.js 20 or higher (the SDK requires a recent Node version)
- TypeScript installed:
npm install -g typescript - An MCP-compatible editor to test (Cursor or Claude Desktop)
- For the example, a simulated data source — here a fictional CRM in memory, which you'll replace with your real database
On the knowledge side, an intermediate level of TypeScript is enough: understanding async/await, object types, and importing ESM modules. No prior MCP knowledge is required — that's exactly the point of this guide.
How to Initialize the Project? (Step 1)
 Complete pipeline: from npm initialization to production security
Start by creating the project folder and installing the dependencies. The core package is the official SDK @modelcontextprotocol/sdk, maintained by the Model Context Protocol team.
mkdir my-mcp-server
cd my-mcp-server
npm init -y
npm install @modelcontextprotocol/sdk
npm install -D typescript @types/node ts-node
npx tsc --init
Then configure your tsconfig.json for ESM mode, required by the SDK:
{
  "compilerOptions": {
    "target": "ES2022",
    "module": "ESNext",
    "moduleResolution": "bundler",
    "outDir": "./dist",
    "strict": true,
    "esModuleInterop": true
  }
}
Add "type": "module" to your package.json so Node interprets the compiled files as ES modules. This is a common source of errors: without this line, the SDK's .js imports fail at runtime.
How to Create the Basic MCP Server? (Step 2)
The SDK offers two levels of API. The Server class (low-level, server/index.js) gives direct access to the protocol handlers — that's the approach we use here to fully understand the mechanics. The McpServer class (high-level, server/mcp.js) is more ergonomic; we'll come back to it.
Create src/index.ts and instantiate the server by declaring its name, version and capabilities:
// src/index.ts
import { Server } from "@modelcontextprotocol/sdk/server/index.js";
import { StdioServerTransport } from "@modelcontextprotocol/sdk/server/stdio.js";
import { CallToolRequestSchema, ListToolsRequestSchema } from "@modelcontextprotocol/sdk/types.js";

const server = new Server(
  { name: "my-crm-mcp", version: "1.0.0" },
  { capabilities: { tools: {} } }
);

// Simulated CRM data (replace with your real source)
const clients = [
  { id: "1", name: "Acme Corp", email: "contact@acme.com", pipeline: "Negotiation", value: 15000 },
  { id: "2", name: "Globex Inc", email: "info@globex.com", pipeline: "Prospect", value: 5000 },
  { id: "3", name: "Initech LLC", email: "hello@initech.io", pipeline: "Active client", value: 42000 },
];
The capabilities field declares what your server can do. Here, tools: {} announces that the server exposes tools. You'll add resources: {} and prompts: {} later, when you enable those primitives.
How to Define Tools in an MCP Server? (Step 3)
A tool is an action the agent can trigger. Each tool has a name, a natural-language description (read by the LLM to decide when to call it) and an input schema (inputSchema) in JSON Schema format that describes its parameters.
First declare the list of available tools via the ListToolsRequestSchema handler:
server.setRequestHandler(ListToolsRequestSchema, async () => ({
  tools: [
    {
      name: "get_client",
      description: "Retrieves client information by email or name",
      inputSchema: {
        type: "object",
        properties: {
          query: { type: "string", description: "Client email or name" }
        },
        required: ["query"]
      }
    },
    {
      name: "list_pipeline",
      description: "Lists all clients at a sales pipeline stage",
      inputSchema: {
        type: "object",
        properties: {
          stage: { type: "string", description: "Pipeline stage (Prospect, Negotiation, Active client)" }
        },
        required: ["stage"]
      }
    }
  ]
}));
The quality of the descriptions is decisive. The LLM only sees this text to decide when and how to use a tool. A vague description ("retrieves data") leads to random calls; a precise one ("retrieves a client by email or name") guides the agent toward the right usage.
How Does a Tool Call Work End to End?
Before implementing the logic, let's visualize the full call cycle. The client starts with a handshake (initialize), discovers the capabilities, lists the tools, then calls the tool chosen by the LLM.
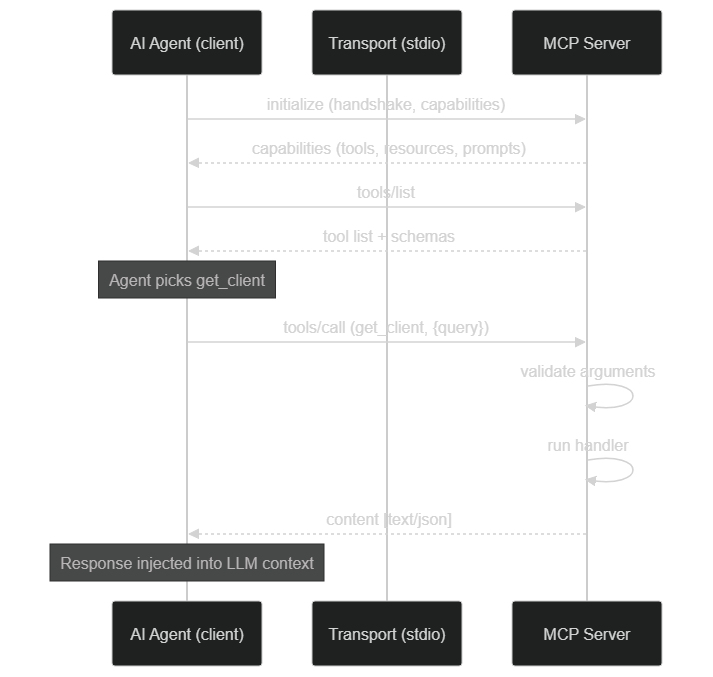 From handshake to response: the client negotiates, lists tools, then runs the tool with validated arguments before injecting the result into the LLM context
Now implement the execution logic via the CallToolRequestSchema handler. It receives the tool name and its arguments, runs the right branch, and returns a content array:
server.setRequestHandler(CallToolRequestSchema, async (request) => {
  const { name, arguments: args } = request.params;

  if (name === "get_client") {
    const { query } = args as { query: string };
    const client = clients.find(c =>
      c.email.includes(query) || c.name.toLowerCase().includes(query.toLowerCase())
    );
    if (!client) return { content: [{ type: "text", text: "No client found" }] };
    return { content: [{ type: "text", text: JSON.stringify(client, null, 2) }] };
  }

  if (name === "list_pipeline") {
    const { stage } = args as { stage: string };
    const results = clients.filter(c => c.pipeline === stage);
    const total = results.reduce((sum, c) => sum + c.value, 0);
    return {
      content: [{
        type: "text",
        text: JSON.stringify({ clients: results, total_value: total }, null, 2)
      }]
    };
  }

  throw new Error("Tool not found: " + name);
});
The return format matters: content is always an array of typed elements (text, image, etc.). For structured data, you serialize to JSON inside a text block. The cast args as { query: string } here is a simplified example shortcut — in production, validate the arguments properly (see below).
How to Start the stdio Transport and Connect to a Client? (Step 4)
The server is ready but isn't communicating yet. It needs a transport. For local use (Cursor, Claude Desktop), the stdio transport is the simplest: the client launches your server as a subprocess and exchanges messages via standard input/output.
async function main() {
  const transport = new StdioServerTransport();
  await server.connect(transport);
  // Write to stderr because stdout is reserved for the protocol
  console.error("MCP server started and waiting for connections...");
}

main().catch(console.error);
Crucial point: with the stdio transport, stdout is reserved for protocol messages. Any console.log would corrupt the communication. Always use console.error (which writes to stderr) for your debug logs.
Compile and run:
npx tsc && node dist/index.js
To connect the server to Cursor, declare it in ~/.cursor/mcp.json:
{
  "mcpServers": {
    "my-crm": {
      "command": "node",
      "args": ["/absolute/path/to/dist/index.js"]
    }
  }
}
The configuration for Claude Desktop is nearly identical: you fill in command and args in the claude_desktop_config.json file (path varies by OS). In both cases, the client takes care of starting the process and managing its lifecycle. You can also expose this server to a no-code workflow: we detail this integration in our guide on connecting n8n to an MCP server.
How to Expose Resources and Prompts? (Step 5)
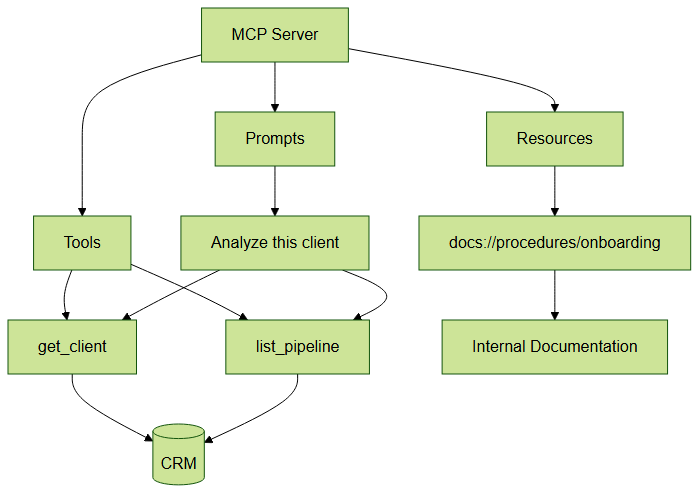 MCP server architecture: Tools for actions, Resources for read-only data, Prompts for pre-built templates
Tools are just one of the three MCP primitives. You can also expose resources (read-only data, like your internal wiki) and prompts (pre-formatted instruction templates).
Resources let your agent access static or semi-static data without calling a tool: documentation, procedures, pricing, product catalog. Each resource is identified by a uri. You declare the list, then implement the read:
import {
  ListResourcesRequestSchema,
  ReadResourceRequestSchema,
} from "@modelcontextprotocol/sdk/types.js";

// List the exposed resources
server.setRequestHandler(ListResourcesRequestSchema, async () => ({
  resources: [
    {
      uri: "docs://procedures/onboarding",
      name: "Client onboarding procedure",
      description: "The steps to follow to onboard a new client",
      mimeType: "text/markdown",
    },
  ],
}));

// Read the content of a requested resource
server.setRequestHandler(ReadResourceRequestSchema, async (request) => {
  const { uri } = request.params;
  if (uri === "docs://procedures/onboarding") {
    return {
      contents: [{
        uri,
        mimeType: "text/markdown",
        text: "# Onboarding\n1. Create the account\n2. Schedule the kickoff call\n3. Send the access credentials",
      }],
    };
  }
  throw new Error("Resource not found: " + uri);
});
Prompts are reusable instruction templates the user triggers with one click in Cursor or Claude Desktop. Example: an "analyze this client" prompt that chains several tools. Remember to enable these primitives in capabilities (resources: {}, prompts: {}), otherwise the client won't list them.
When should you choose a resource over a tool? Use a resource for read-only data that the agent may want to reference (a policy document, a price list), and a tool for an action that requires parameters or has side effects (querying a record by ID, creating an entry). The distinction matters for the user experience: resources can be attached to the context explicitly by the user, while tools are invoked dynamically by the model. Getting this split right makes your server feel intuitive rather than confusing.
The High-Level McpServer API: Should You Use It?
All the code above uses the low-level Server class, ideal for understanding the protocol. In practice, the official documentation now recommends the McpServer class (server/mcp.js), which handles capability negotiation, request routing, and input validation with Zod for you.
With McpServer, a tool is declared via registerTool, passing a Zod schema instead of a manual JSON Schema:
// Simplified example — check the exact signature in the official MCP docs
import { McpServer } from "@modelcontextprotocol/sdk/server/mcp.js";
import { z } from "zod";

const server = new McpServer({ name: "my-crm-mcp", version: "1.0.0" });

server.registerTool(
  "get_client",
  {
    description: "Retrieves a client by email or name",
    inputSchema: z.object({ query: z.string() }),
  },
  async ({ query }) => ({
    content: [{ type: "text", text: `Query: ${query}` }],
  })
);
The benefit: Zod automatically validates the arguments before calling your handler, and infers the TypeScript types. You remove manual casts (args as ...) and reduce errors. For a new project, McpServer is the recommended default; the Server class remains useful when you need very fine control over the raw handlers. Refer to the official TypeScript SDK documentation for the exact signatures, which evolve across versions.
How to Test and Debug Your Server with MCP Inspector? (Step 6)
MCP Inspector is the official debugging tool. It lets you test your server without opening Cursor on every change — a huge time saver during development. Launch it directly with npx, no prior installation needed:
npx @modelcontextprotocol/inspector node dist/index.js
The Inspector opens a local web interface that shows the complete list of your tools, resources and prompts, a form to test each tool with real arguments, the logs of each call with the full response, and errors in case of serialization problems.
This is the essential tool before connecting your server to a real agent. You validate that each tool responds correctly, that the schemas are properly interpreted, and that errors are clean — all in a feedback loop of a few seconds. Get into the habit of keeping the Inspector open while you code: every tool you add is verified immediately.
How to Automate Testing for Your MCP Server?
The Inspector is irreplaceable for immediate feedback during development, but it doesn't cover non-regression testing. As soon as your server integrates a real database or triggers side-effecting actions — sending emails, writing to a database, calling a third-party API — an automated test suite becomes a safety net for your whole team. Without it, every new feature risks silently breaking an existing handler, with no one noticing until an agent is already in production.
The simplest strategy is to decouple the handlers from the transport layer. Your handlers are ordinary TypeScript functions: you can call them directly in your tests, replacing the real data source with an in-memory mock — exactly like the fictional CRM in our example. With Vitest or Jest, a test for the get_client tool sets up a few fake clients, invokes the business logic, and asserts that the returned content contains the right JSON fields. Everything runs in milliseconds, with no Node process to spin up and no external dependencies to worry about.
For more realistic integration tests, the SDK provides InMemoryTransport, which connects a client and a server in the same test process — no socket, no stdio. You simulate a complete MCP exchange: initialize handshake, tools/list, then tools/call with Zod validation included. This is the most rigorous way to test the initialization sequence, error messages and resource behavior. The approach fits naturally into a CI/CD pipeline, where the full test suite runs automatically on every pull request without any external dependencies.
Finally, adopt the principle of a stable tool contract: avoid renaming an existing tool or changing its input schema in a backward-incompatible way without versioning the server. Agents that rely on your server in production have memorized the names and parameters of your tools. An unannounced change silently breaks entire workflows downstream. The golden rule: prefer adding new tools over modifying existing ones, and increment the version field in the server instantiation with every API surface change. A short tool CHANGELOG, even a minimal one, greatly helps consuming teams adapt their prompts or no-code workflows without being caught off guard.
What Are the Best Practices for Validation, Errors and Security?
A server that works in a demo isn't a production-ready server. Three areas deserve your attention.
Input validation. Never trust the arguments you receive. With McpServer, Zod handles it; with the Server class, validate manually before running anything. A tool that queries a SQL database must absolutely guard against injection: use parameterized queries, never string concatenation.
Error handling. Return clear messages the LLM can act on. Instead of letting a raw exception bubble up, catch it and return an explicit content ("Client not found", "Invalid pipeline stage"). The agent can then rephrase or ask the user for a clarification, instead of crashing.
Security. As soon as the server leaves your local machine, several safeguards become essential:
- Authentication: validate a secret token (Bearer) in each HTTP request
- Rate limiting: limit the number of requests per client per minute
- Access logging: log each tool call with its context (timestamp, tool, arguments)
- HTTPS mandatory: never expose an MCP server on the Internet without TLS encryption
- Principle of least privilege: only expose the tools that are truly needed, with minimal permissions
The security of an MCP server is the same as any exposed API. If your server triggers side-effecting actions (database writes, sending emails), consider a human confirmation mechanism for sensitive operations.
Observability. An MCP server that runs silently is hard to maintain. Instrument each tool: execution time, error rate, call frequency per tool. These metrics quickly reveal which tools the agent actually uses — and which it never does (often because their description is poor). Pair these logs with a session ID to replay a full exchange when a behavior surprises you. Reading these traces is also how you spot hallucinations: a well-described but poorly-triggered tool often points to an ambiguous input schema to fix.
Idempotency. For tools that write, aim for idempotency where possible: the same call repeated should not create the same resource twice. Agents may retry a call after a network timeout; without idempotency, you get duplicates.
How to Deploy Your MCP Server in Production?
Locally, the stdio transport is enough. For a remotely accessible server (team, multiple clients), switch to the streamable HTTP transport, provided by StreamableHTTPServerTransport (server/streamableHttp.js). This transport handles sessions and response streaming, and integrates behind a web server like Express.
// Simplified example — see the official docs for full session management
import { StreamableHTTPServerTransport } from "@modelcontextprotocol/sdk/server/streamableHttp.js";
import { randomUUID } from "node:crypto";

const transport = new StreamableHTTPServerTransport({
  sessionIdGenerator: () => randomUUID(),
});
await server.connect(transport);
// transport.handleRequest(req, res) is called from your HTTP route (e.g. POST /mcp)
On the hosting side, an MCP server is just a Node process: it deploys like any Node.js application — Docker container, VPS, or PaaS platform. Set up a process manager (PM2 or an orchestrator) for automatic restarts, and expose metrics to monitor tool latency. For a complete end-to-end deployment walkthrough, see our tutorial to deploy an AI agent on an MCP server in 20 minutes.
Troubleshooting: What Are the Most Common Errors?
A few classic pitfalls that waste beginners' time:
- Server won't start / broken imports: check
"type": "module"inpackage.jsonand the presence of the.jsextension in your compiled imports. The SDK is ESM only. - The client sees no tools: the corresponding capability isn't declared in
capabilities, or theListToolsRequestSchemahandler isn't registered. - Garbled communication over stdio: a
console.logis lingering somewhere. Replace it withconsole.error. - Path not found on the client side: use an absolute path to
dist/index.jsinmcp.json. Relative paths aren't resolved reliably. - Invalid arguments accepted: without validation, mistyped arguments get through and crash the handler. Switch to
McpServer+ Zod.
What Can You Connect Next?
Once this basic MCP server is mastered, the natural next connections are:
- Your PostgreSQL or MySQL database via a connection pool
- HubSpot, Salesforce or Pipedrive via their official APIs
- Your Notion or Confluence documentation for internal RAG
- Your n8n pipelines to trigger workflows from the AI agent
MCP is part of a broader movement toward agent interoperability. To understand where the protocol fits relative to emerging standards, read our analysis on MCP, A2A and AI agent interoperability. And if you work mostly on the automation side, our guide on the n8n AI Agent: turning workflows into intelligent systems shows how an MCP server multiplies a no-code agent.
How Long Does It Really Take to Build an MCP Server?
The title promises 30 minutes — let's keep that promise honestly. For a basic server, one or two tools on simple data, 30 minutes is enough once the Node environment is ready: 5 minutes of initialization, 10 minutes for the tools, 5 minutes for the transport and the Cursor connection, 10 minutes of testing in the Inspector. That's the "works on my machine" version.
Moving to a production server takes more: connecting a real database, validating every input with Zod, adding authentication, rate limiting, logs and automated tests. Plan for one to two days depending on the complexity of the systems to wire in. The good news: the protocol's learning curve is crossed only once. The second MCP server you write will go much faster than the first.
Key Takeaways
Building an MCP server in TypeScript comes down to a few clear steps: initialize the project with the official SDK, declare self-describing tools, implement their handlers, wire up a stdio transport, expose resources and prompts, test with MCP Inspector, then secure and deploy. The real value isn't in the complexity of the code — it's minimal — but in standardization: one server, and all your agents understand it.
Start small (one or two tools on data you control), validate in the Inspector, then progressively wire in your real systems. It's the fastest path to AI agents that are genuinely useful in your business context.
Do you want a custom MCP server that gives your agents access to your proprietary data? BOVO Digital designs and delivers MCP servers in production.
Tags
FAQ
Does MCP work with all AI agents or only Claude?
MCP is an open protocol supported by Claude (Anthropic), Cursor, and adapters are available for GPT-5 via community wrappers. Compatibility is expanding rapidly — in 2026, MCP has become the de facto standard for agent-data connectivity.
Do I need advanced TypeScript skills to create an MCP server?
An intermediate level of TypeScript is sufficient. The official @modelcontextprotocol/sdk library abstracts the protocol complexity. Key concepts to master: TypeScript generics, async/await, and Node.js basics. This tutorial guides you through all of it.
What is the difference between the low-level Server API and McpServer?
The Server class (server/index.js) exposes the raw protocol handlers via setRequestHandler — useful for fine-grained control. The McpServer class (server/mcp.js) is the recommended ergonomic API: registerTool, registerResource and registerPrompt handle capability negotiation and input validation with Zod. Always check the exact signature in the official MCP docs.
What is the difference between the stdio transport and the HTTP transport?
The stdio transport makes the client and server communicate via the standard input and output of a local process — ideal for Cursor or Claude Desktop. The streamable HTTP transport (StreamableHTTPServerTransport) exposes the server over the network for remote clients, with session management. Start with stdio, then move to HTTP for production.
Can BOVO Digital create a custom MCP server for my company?
Yes. BOVO Digital designs MCP servers that connect your AI agents to your proprietary data: CRM, ERP, document base, internal APIs. Typical timeline: 5 to 10 business days depending on the complexity of the systems to connect.
Can I write automated tests for an MCP server in TypeScript?
Yes. The recommended strategy is to decouple the handlers from the transport layer and test them directly with Vitest or Jest, substituting the data source with an in-memory mock. For full integration tests, the SDK provides InMemoryTransport, which simulates a complete MCP exchange (handshake, tools/list, tools/call) in a single process, with no socket or stdio.
Ready to implement this?
Book a free 30-min strategy call with our experts
We'll analyze your situation and propose a concrete action plan.
William Aklamavo
Web development and automation expert, passionate about technological innovation and digital entrepreneurship.


