
n8n Docker: Complete Installation and Configuration Guide (2026)
Installing n8n with Docker is the fastest way to deploy your own automation instance. This step-by-step guide covers Docker Compose, HTTPS, and essential environment variables.

Updated

n8n Docker: Complete Installation and Configuration Guide (2026)
Fifteen minutes to go from a blank server to an automation engine you control 100%.
Installing n8n with Docker is now the most reliable way to host your own automation engine. In a handful of commands, you get an isolated, reproducible and easy-to-update n8n instance — without paying the cloud subscription and without handing your data to a third party. This is exactly what teams want when they need to keep control of their workflows, credentials and compliance.
This guide goes well beyond a simple copy-paste. You will find a complete, commented docker-compose.yml (n8n + PostgreSQL + volumes), the environment variables that actually matter, three HTTPS reverse-proxy options (Caddy, Nginx, Traefik), a backup strategy, the steps to update without data loss, and queue mode to handle scale. Everything is designed for a production-ready instance.
Why install n8n with Docker rather than natively?
Before diving into commands, let's understand why Docker has become the standard way to deploy n8n.
- Complete isolation: n8n runs in its own container, with its own Node.js version and dependencies. No conflicts with other services on your server.
- One-command updates: swapping an image for a newer version is done with
docker compose pullthenup -d. No manual package juggling. - Persistent data: Docker volumes preserve your workflows, encrypted credentials and PostgreSQL database, even after a restart or a container recreation.
- Reproducible: the same
docker-compose.ymldeploys identically on a dev, staging or production VPS. You describe your infrastructure in a Git-versioned file. - Free and open source: the n8n Community Edition imposes no limit on the number of workflows or active executions.
The alternative — a native install via npm — works, but exposes you to Node.js version conflicts, complicates updates and makes reproducibility hard. For serious use, n8n with Docker remains the most robust choice. If you are still weighing Docker against a direct install, our complete guide to installing n8n self-hosted on a VPS covers both approaches.
There is also a clear cost angle. The n8n cloud plans bill per active workflow and per execution volume, which grows with your usage. A self-hosted Docker instance, by contrast, costs only the price of your VPS — typically a fixed monthly amount regardless of how many workflows you run. For teams that automate aggressively, this difference compounds quickly, and you keep your data on infrastructure you fully control. The trade-off is that you become responsible for updates, backups and security — exactly the topics this guide walks you through.
When does self-hosted Docker make sense versus n8n Cloud?
Cost is only one of three criteria that tip the balance toward self-hosting. The second is load. If your workflows process large volumes or sharp peaks, you want to add workers on your own terms rather than renegotiating a plan tier. A Docker setup lets you scale horizontally with queue mode — something you simply cannot do on a managed plan. The third is data sovereignty. Hosting it yourself guarantees that credentials, payloads and logs never leave infrastructure you control, which is often a decisive argument for healthcare, legal or public-sector teams bound by strict compliance rules.
There is also a question of technical freedom. Self-hosting unlocks advanced environment variables, custom npm packages inside your workflows, and direct network access to your internal databases — capabilities a managed plan deliberately restricts. The honest counterweight is operational responsibility: you own the updates, the backups and the hardening. n8n Cloud remains the pragmatic choice for small teams who value zero maintenance over control. But the moment cost, scale or compliance becomes a real constraint, installing n8n with Docker is the path that keeps every door open.
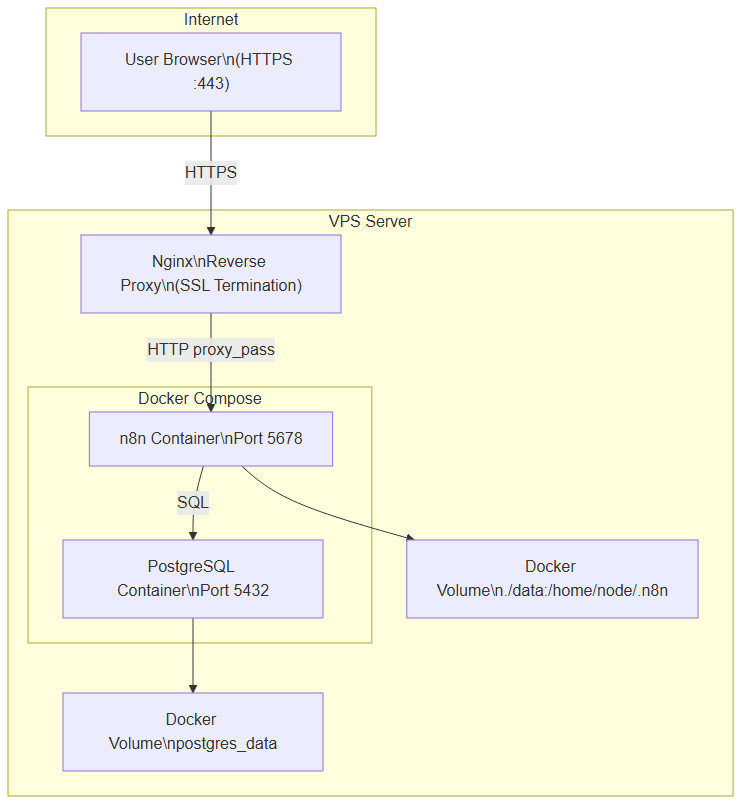 Full architecture: the reverse proxy terminates SSL, proxies to the n8n container which writes to PostgreSQL via Docker volumes
What are the prerequisites to install n8n with Docker?
To follow this tutorial smoothly, gather the following:
- A Linux VPS (Ubuntu 22.04 LTS recommended) with at least 1 GB of RAM. Plan for 2 GB if you expect heavy workflows or AI agents.
- Docker Engine 24.x or higher and Docker Compose V2 (the
docker composecommand, two words, not the olddocker-compose). - A domain name (or subdomain, e.g.
n8n.your-domain.com) whose A record points to your server's public IP address. Mandatory for HTTPS. - SSH access with a user that has Docker permissions.
Check your versions before starting:
docker --version
docker compose version
If Docker is not installed, the official Docker script does the job in seconds:
curl -fsSL https://get.docker.com | sh
sudo usermod -aG docker $USER
Log out and back in so the docker group membership takes effect.
How to install n8n with Docker Compose step by step?
The installation breaks down into eight logical steps, from a bare server to a backed-up instance. The diagram below summarizes the full journey.
 The 8 steps to install n8n with Docker: prepare the VPS, write docker-compose, set variables, launch, secure with HTTPS and back up
Step 1: create the directory structure
Group all configuration in a dedicated folder. The data subfolder will hold n8n's internal files (including the encryption key).
mkdir -p ~/n8n/data
cd ~/n8n
Step 2: isolate secrets in a .env file
Rather than writing passwords in plain text inside docker-compose.yml, centralize them in a .env file that Docker Compose reads automatically. First generate a strong encryption key:
openssl rand -hex 32
Then create the .env file:
# ~/n8n/.env — never commit this file to Git
DOMAIN=n8n.your-domain.com
GENERIC_TIMEZONE=Europe/London

# Credential encryption key (from openssl rand -hex 32)
N8N_ENCRYPTION_KEY=paste-your-64-character-key-here

# PostgreSQL database
POSTGRES_DB=n8n
POSTGRES_USER=n8n_user
POSTGRES_PASSWORD=a-long-random-password
Simplified example: adapt the values to your environment. Add this file to your
.gitignore.
Step 3: write the complete docker-compose.yml
Here is a commented docker-compose.yml combining n8n and PostgreSQL, with persistence and variables read from the .env file. Each block is annotated so you understand its role.
version: '3.8'

services:
  n8n:
    image: docker.n8n.io/n8nio/n8n:latest   # in prod, pin a specific version (e.g. :1.70.0)
    container_name: n8n
    restart: unless-stopped
    ports:
      - "127.0.0.1:5678:5678"   # local only: the reverse proxy handles public access
    environment:
      # --- Public URL and webhooks ---
      - N8N_HOST=${DOMAIN}
      - N8N_PORT=5678
      - N8N_PROTOCOL=https
      - N8N_EDITOR_BASE_URL=https://${DOMAIN}/
      - WEBHOOK_URL=https://${DOMAIN}/
      - GENERIC_TIMEZONE=${GENERIC_TIMEZONE}
      # --- Security ---
      - N8N_ENCRYPTION_KEY=${N8N_ENCRYPTION_KEY}
      - N8N_SECURE_COOKIE=true
      - N8N_PROXY_HOPS=1   # number of reverse proxies in front of n8n
      # --- PostgreSQL database ---
      - DB_TYPE=postgresdb
      - DB_POSTGRESDB_HOST=postgres
      - DB_POSTGRESDB_PORT=5432
      - DB_POSTGRESDB_DATABASE=${POSTGRES_DB}
      - DB_POSTGRESDB_USER=${POSTGRES_USER}
      - DB_POSTGRESDB_PASSWORD=${POSTGRES_PASSWORD}
    volumes:
      - ./data:/home/node/.n8n   # internal workflows, encryption key, config
    depends_on:
      postgres:
        condition: service_healthy

  postgres:
    image: postgres:16-alpine
    container_name: n8n_postgres
    restart: unless-stopped
    environment:
      - POSTGRES_DB=${POSTGRES_DB}
      - POSTGRES_USER=${POSTGRES_USER}
      - POSTGRES_PASSWORD=${POSTGRES_PASSWORD}
    volumes:
      - postgres_data:/var/lib/postgresql/data
    healthcheck:
      test: ["CMD-SHELL", "pg_isready -U ${POSTGRES_USER} -d ${POSTGRES_DB}"]
      interval: 10s
      timeout: 5s
      retries: 5

volumes:
  postgres_data:
A few important points about this configuration:
- The n8n port is bound to
127.0.0.1: it is not reachable directly from the Internet. Only the reverse proxy exposes it, over HTTPS. - The PostgreSQL
healthcheckcombined withdepends_on: condition: service_healthyensures n8n only starts once the database is ready to accept connections. N8N_ENCRYPTION_KEYis set explicitly. It encrypts your credentials: losing it makes your stored identifiers unusable.
Step 4: launch n8n and verify
docker compose up -d
Check that both containers are running, then watch the n8n logs:
docker compose ps
docker compose logs -f n8n
On first launch, n8n applies the database migrations then shows the editor URL. Since the instance now uses the built-in user management, open your domain in the browser and create the owner account (email + password). The diagram below shows what happens behind the scenes when a workflow is triggered by a webhook.
 The reverse proxy terminates SSL, proxies to n8n on port 5678, which reads and writes data to PostgreSQL
Which n8n environment variables are essential?
n8n is configured almost entirely through environment variables. Here are the most useful, grouped by theme. All are documented in the official n8n documentation.
Authentication and owner account
Since n8n 1.0, user management is built in: you create an owner account on first launch, and the old HTTP "Basic Auth" (N8N_BASIC_AUTH_*) is deprecated. For a multi-user instance, configure email sending (SMTP) so you can invite colleagues. Also enable N8N_SECURE_COOKIE=true since you serve n8n over HTTPS.
Public URL, webhooks and timezone
These variables are critical when n8n sits behind a reverse proxy. If they are wrong, webhooks and OAuth authentication URLs will be incorrect.
| Variable | Description | Example |
|---|---|---|
N8N_HOST | Your instance domain | n8n.mydomain.com |
N8N_PROTOCOL | Exposed protocol | https |
N8N_EDITOR_BASE_URL | Editor base URL | https://n8n.mydomain.com/ |
WEBHOOK_URL | Public webhook URL | https://n8n.mydomain.com/ |
GENERIC_TIMEZONE | Timezone for scheduled triggers | Europe/London |
N8N_PROXY_HOPS | Number of proxies in front of n8n | 1 |
Encryption key and data retention
| Variable | Description | Example |
|---|---|---|
N8N_ENCRYPTION_KEY | Encrypts credentials | Generate with openssl rand -hex 32 |
N8N_LOG_LEVEL | Log level | info or debug |
EXECUTIONS_DATA_PRUNE | Enables execution pruning | true |
EXECUTIONS_DATA_MAX_AGE | Log retention (hours) | 168 (7 days) |
DB_TYPE | Database type | postgresdb |
The N8N_ENCRYPTION_KEY variable deserves special attention. If you do not set it, n8n generates one on first launch and stores it in data/.n8n/config. As long as that folder is persistent, all is well. But if you recreate the instance on another server without recovering that key, all your credentials become unreadable. Setting it explicitly and backing it up is therefore a golden rule.
Why each critical variable truly matters
It is tempting to copy-paste a list of variables without understanding their effect. That is a mistake, because each one has a concrete consequence in production. Take them one by one. The encryption key is the most sensitive: it protects your connection credentials (APIs, databases, third-party accounts) at rest. A lost key means manually re-entering every credential of every workflow; a key leaked in a public Git repository means an attacker able to decrypt your vault. Hence the importance of storing it in a .env file kept out of Git, or better yet in a secrets manager.
The URL variables — N8N_HOST, N8N_PROTOCOL, N8N_EDITOR_BASE_URL and WEBHOOK_URL — determine the public address n8n advertises to the outside world. If WEBHOOK_URL is wrong, third-party services (Stripe, GitHub, Telegram…) will call an incorrect URL and your automations stay silent, with no obvious error. Likewise, an incorrect N8N_EDITOR_BASE_URL breaks OAuth redirects: you cannot connect Google, Microsoft or Slack. These failures are silent and often cost hours of debugging, when a single variable is to blame.
GENERIC_TIMEZONE looks harmless, but it drives the trigger time of your scheduled workflows. A misconfigured timezone, and your "every morning at 8 a.m." report fires in the middle of the night. Finally, EXECUTIONS_DATA_MAX_AGE and EXECUTIONS_DATA_PRUNE control execution-history retention: without pruning, the PostgreSQL executions table grows indefinitely, slows the interface and eventually fills the disk. Setting these variables is not cosmetic: it is what separates a stable instance from one that degrades within a few weeks.
How to configure a reverse proxy and HTTPS for n8n?
n8n must be served over HTTPS: webhooks, OAuth authentication and secure cookies require it. The reverse proxy terminates SSL (handles the certificate) and forwards traffic to the n8n container. Here are three options, from simplest to most advanced.
Option A — Caddy (simplest, automatic HTTPS)
Caddy obtains and renews Let's Encrypt certificates automatically, with no manual configuration. It is the ideal option to get started. Add a caddy service to your docker-compose.yml and create a Caddyfile:
# Caddyfile
n8n.your-domain.com {
    reverse_proxy n8n:5678
}
Caddy detects the domain, requests the certificate and automatically redirects HTTP to HTTPS. In three lines, your n8n with Docker instance is served over valid HTTPS.
Option B — Nginx + Certbot (the classic)
If you already run Nginx, here is a working server block. Note the Upgrade / Connection headers that are essential for the n8n editor's WebSockets.
server {
    listen 443 ssl;
    server_name n8n.your-domain.com;

    ssl_certificate     /etc/letsencrypt/live/n8n.your-domain.com/fullchain.pem;
    ssl_certificate_key /etc/letsencrypt/live/n8n.your-domain.com/privkey.pem;

    location / {
        proxy_pass http://127.0.0.1:5678;
        proxy_set_header Host $host;
        proxy_set_header X-Real-IP $remote_addr;
        proxy_set_header X-Forwarded-For $proxy_add_x_forwarded_for;
        proxy_set_header X-Forwarded-Proto $scheme;
        proxy_buffering off;

        # WebSockets (n8n editor push)
        proxy_http_version 1.1;
        proxy_set_header Upgrade $http_upgrade;
        proxy_set_header Connection "upgrade";
    }
}
Get the certificate with Certbot:
certbot --nginx -d n8n.your-domain.com
Option C — Traefik (Docker-oriented, multi-service)
Traefik is configured through labels directly in docker-compose.yml. Handy if you expose several services behind a single proxy. Simplified example of labels to add to the n8n service:
labels:
  - traefik.enable=true
  - traefik.http.routers.n8n.rule=Host(`n8n.your-domain.com`)
  - traefik.http.routers.n8n.tls=true
  - traefik.http.routers.n8n.tls.certresolver=letsencrypt
  - traefik.http.services.n8n.loadbalancer.server.port=5678
Whichever proxy you choose, set N8N_PROXY_HOPS to the number of proxies traversed (1 in most cases). Without it, n8n may misread the client's real IP address passed in X-Forwarded-For.
How to handle persistence and backups for n8n?
Persistence relies on two volumes: the ./data folder (n8n's encryption key and internal config) and the postgres_data volume (all your data: workflows, executions, encrypted credentials). Backing up one without the other is not enough: without the encryption key, a restored database cannot decrypt its credentials.
Daily backup script
This script exports the PostgreSQL database, archives the data folder, and deletes backups older than 30 days.
#!/bin/bash
# ~/backup-n8n.sh — simplified example
set -euo pipefail
DATE=$(date +%Y%m%d_%H%M%S)
BACKUP_DIR=~/backups
mkdir -p "$BACKUP_DIR"

# 1. Dump the PostgreSQL database
docker exec n8n_postgres pg_dump -U n8n_user n8n > "$BACKUP_DIR/n8n_db_$DATE.sql"

# 2. Archive the data folder (contains the encryption key)
tar czf "$BACKUP_DIR/n8n_data_$DATE.tar.gz" -C ~/n8n data

# 3. Rotation: keep 30 days
find "$BACKUP_DIR" -name "n8n_*" -mtime +30 -delete
Schedule it via cron for a nightly run at 3 a.m.:
0 3 * * * /bin/bash ~/backup-n8n.sh
Restoring a backup
To restore the database on a new instance, recreate an empty PostgreSQL container then re-inject the dump:
cat ~/backups/n8n_db_20260603_030000.sql | docker exec -i n8n_postgres psql -U n8n_user -d n8n
Remember to also restore the data folder (and therefore the encryption key) before restarting n8n.
How to update n8n without losing data?
n8n ships new versions very frequently. Updating is simple, but a few precautions avoid nasty surprises.
cd ~/n8n
docker compose pull   # download the new image
docker compose up -d  # recreate the containers with the new version
On restart, n8n automatically applies the required database migrations. Your workflows and credentials are preserved because they live in PostgreSQL and in the data volume, never in the container itself.
Three best practices for stress-free updates:
- Pin the version in production (
docker.n8n.io/n8nio/n8n:1.70.0rather than:latest). You then control exactly when you upgrade. - Back up before every major upgrade. A schema migration is rarely reversible.
- Read the release notes to spot any behavior changes (breaking changes) before updating.
These precautions deserve a closer look, because update pitfalls are the number-one cause of outages on a self-hosted instance. The trickiest part involves schema migrations. When n8n starts on a newer version, it automatically alters your PostgreSQL structure to match the new code. These operations are designed to move forward, not backward: there is no clean "downgrade" button. In practice, if you try to relaunch an older image after a migration, the old code will not recognize the transformed schema and will refuse to start. That is why jumping several major versions at once is risky — it is far safer to progress step by step and test each stage.
Version compatibility also matters between components. In queue mode, the main instance and all workers must run the same version of n8n: a worker lagging behind the main process may misinterpret a serialized execution and fail it. The only truly reliable rollback strategy therefore remains restoration: revert to the previous image and re-inject the database backup taken just before the upgrade. This is exactly why the "back up before every major update" rule is non-negotiable. Get into the habit of testing the new version on a staging instance with a copy of your data first: you will catch a breaking change before it reaches your critical workflows.
How to scale n8n with queue mode?
By default, n8n runs all workflows in a single process (regular mode). This is enough for dozens of workflows. But if you process a large volume of concurrent executions, queue mode distributes the load across multiple workers.
How do you know it is time to switch? Watch for three signals: executions that pile up in a queue and start late, a main process that saturates its CPU during peaks, and webhook responses that become sluggish under load. As long as a single instance keeps up, queue mode adds unnecessary complexity. The moment latency or reliability suffers, splitting the workload across workers is the cleanest way to scale without rewriting a single workflow.
The principle: the main instance (main) receives triggers and pushes tasks into a Redis queue. Worker containers consume that queue and run workflows in parallel. They all share the same PostgreSQL database.
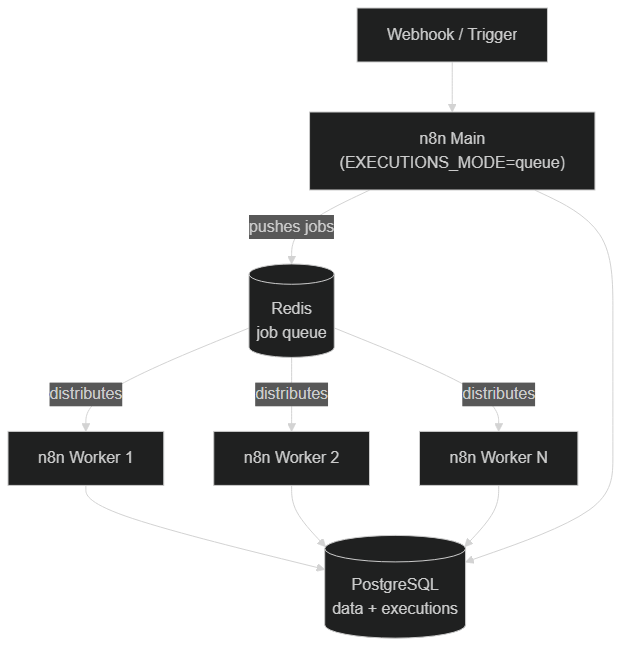 Queue mode: the main instance pushes executions into Redis, which distributes them to several n8n workers writing to the same PostgreSQL database
To enable queue mode, add a Redis service, set EXECUTIONS_MODE=queue on the main container, and declare one or more worker services launched with the worker command:
# Simplified example — snippet to add to your docker-compose.yml
  redis:
    image: redis:7-alpine
    restart: unless-stopped

  n8n-worker:
    image: docker.n8n.io/n8nio/n8n:latest
    restart: unless-stopped
    command: worker        # launches n8n in worker mode
    environment:
      - EXECUTIONS_MODE=queue
      - QUEUE_BULL_REDIS_HOST=redis
      - N8N_ENCRYPTION_KEY=${N8N_ENCRYPTION_KEY}
      - DB_TYPE=postgresdb
      - DB_POSTGRESDB_HOST=postgres
      - DB_POSTGRESDB_DATABASE=${POSTGRES_DB}
      - DB_POSTGRESDB_USER=${POSTGRES_USER}
      - DB_POSTGRESDB_PASSWORD=${POSTGRES_PASSWORD}
    depends_on:
      - postgres
      - redis
All workers must share the same N8N_ENCRYPTION_KEY and the same PostgreSQL database as the main instance. To add capacity, increase the number of worker replicas. On the resource side, plan for more RAM as you scale: the chart below gives indicative orders of magnitude by usage profile.
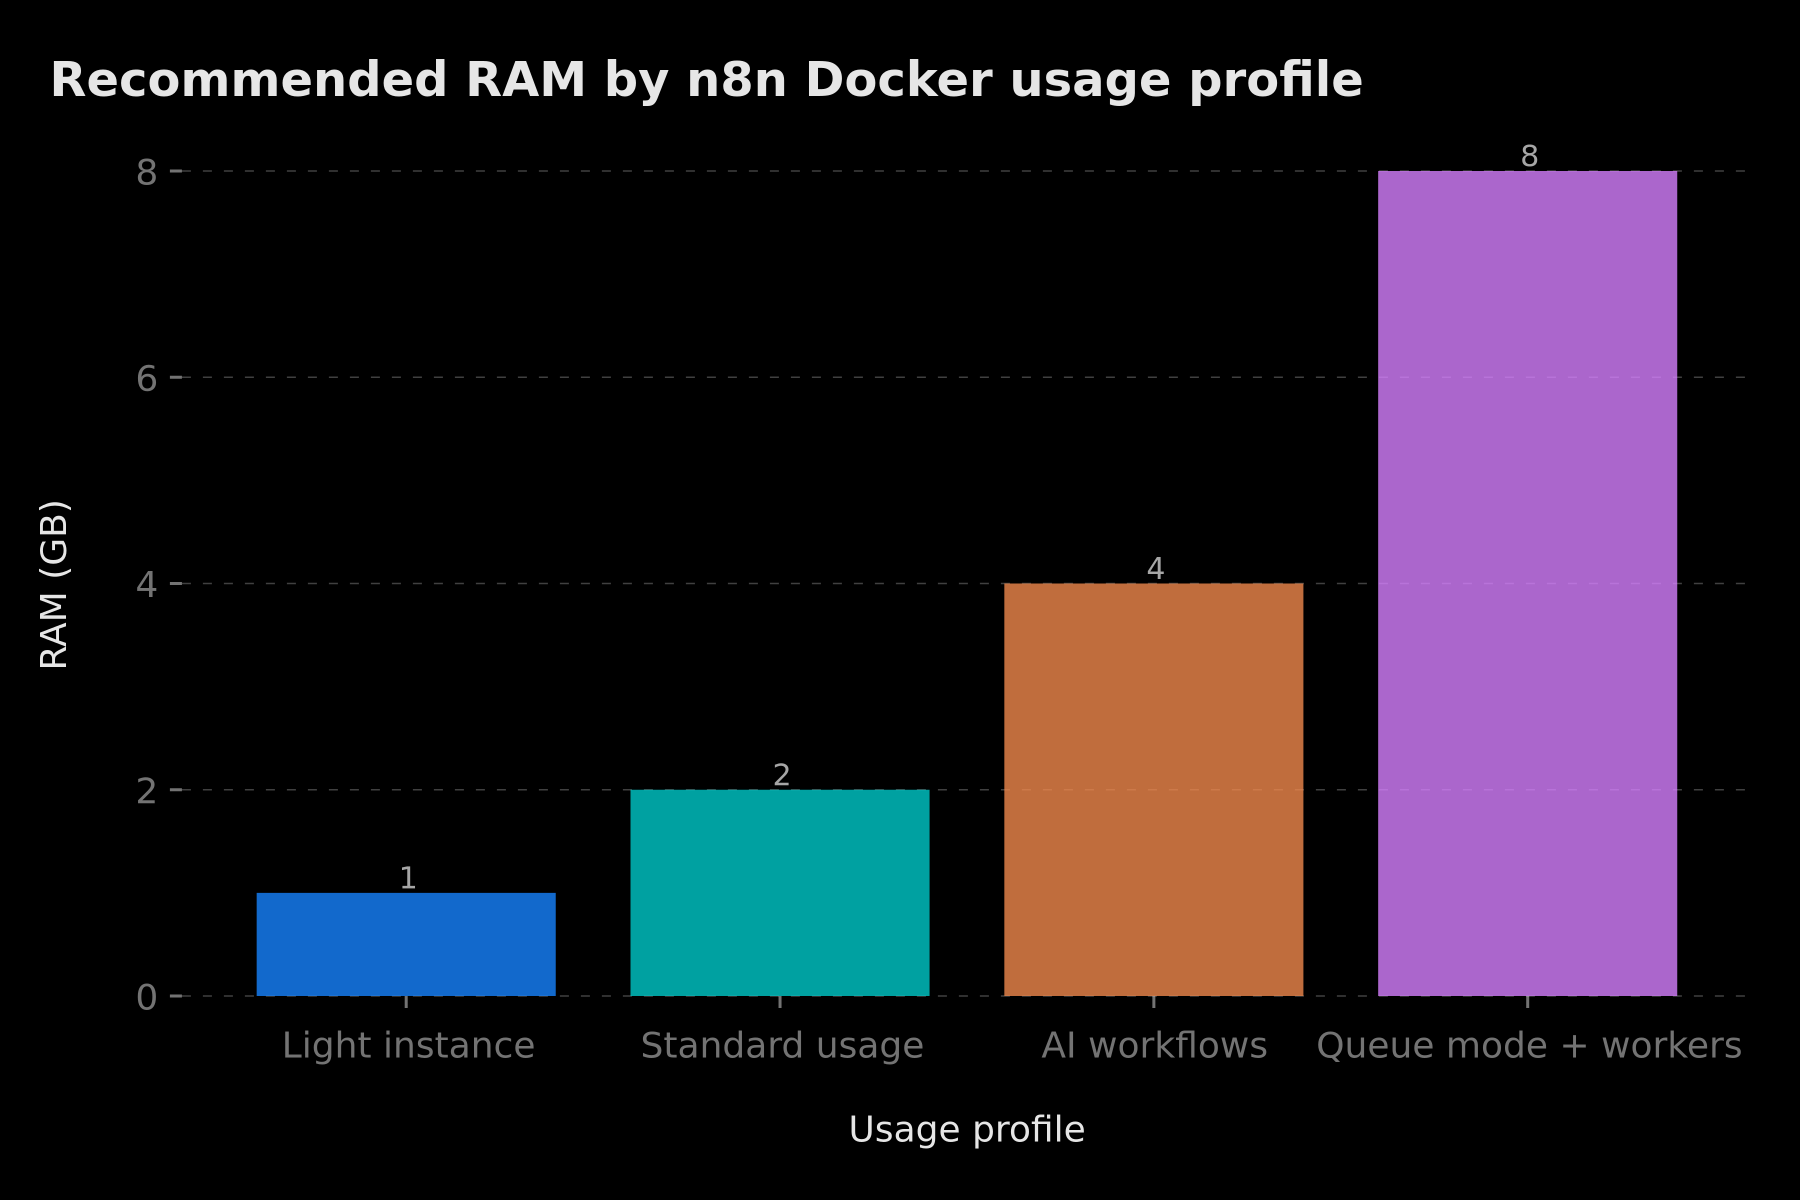 Indicative RAM estimate to plan for: 1 GB for a light instance, up to 8 GB for a queue-mode setup with several workers
This horizontal scaling is one of the strengths of self-hosting. If you build particularly demanding AI-agent workflows, our article on how to turn your n8n workflows into intelligent systems explains how to structure those workloads.
How to secure your n8n Docker instance in production?
An instance exposed to the Internet must be hardened. Here are the essential measures:
- Never expose port 5678 directly. Bind it to
127.0.0.1and let the reverse proxy handle public access over HTTPS. - Enable a firewall (UFW) that only allows ports 22 (SSH), 80 and 443.
- Use long, random passwords for PostgreSQL and the n8n owner account.
- Back up the encryption key in a secrets manager, separately from the server.
- Restrict origins via
N8N_SECURE_COOKIE=trueand a dedicated domain. - Update regularly the n8n image and the OS to apply security patches.
- Monitor logs (
docker compose logs) and set up an alert for abnormal restarts.
If you connect n8n to external services via the MCP protocol, also read our guide to connecting n8n to an MCP server securely, which details authentication best practices.
Thinking in terms of attack surface
Beyond the checklist, it helps to think like an attacker. Your attack surface is the set of points through which someone can interact with your system: the SSH port, the reverse proxy, the n8n interface, and every service you expose. The guiding principle is simple: anything that does not need to be reachable from the Internet should not be. This is precisely why we bind port 5678 to 127.0.0.1 rather than 0.0.0.0. In the first case, n8n only listens for local connections and only the reverse proxy can reach it; in the second, anyone on the Internet could type your IP followed by the port and land directly on the editor, unencrypted.
Docker's network isolation is an underrated asset. By default, containers in the same Compose file communicate over a private network, addressing each other by service name (postgres, redis). Your database therefore has no reason to publish its port 5432 to the host: n8n reaches it over the internal network, and the outside world sees nothing of it. Reducing published ports this way reduces the number of potential entry points. Apply the same reasoning to Redis in queue mode: it stays internal, never exposed.
The principle of least privilege completes the isolation. The PostgreSQL account n8n uses should only have rights on its own database, with a long, unique, randomly generated password — not one reused elsewhere. Secrets management follows the same logic: the encryption key and passwords live in a .env excluded from Git, ideally backed up in a dedicated vault, and never written in plain text in a repository or a chat channel. Finally, keep the OS and the n8n image up to date: a patched but unapplied vulnerability is still an open door. Security is not a switch, it is a discipline of regular maintenance.
Troubleshooting: common issues with n8n Docker
| Symptom | Likely cause | Fix |
|---|---|---|
| Webhooks return a wrong URL | WEBHOOK_URL unset or wrong | Set WEBHOOK_URL to your full public domain |
| OAuth fails on redirect | Incorrect N8N_EDITOR_BASE_URL | Align it with the public HTTPS URL |
| Credentials unreadable after migration | Different encryption key | Restore the original N8N_ENCRYPTION_KEY |
| Editor does not update in real time | Missing WebSocket headers | Add Upgrade / Connection "upgrade" to the proxy |
| n8n starts before PostgreSQL | No healthcheck | Use depends_on: condition: service_healthy |
| Wrong client IP in logs | N8N_PROXY_HOPS unset | Set it to the number of proxies (often 1) |
When a behavior surprises you, the first reflex should be docker compose logs -f n8n: most configuration errors appear there explicitly.
To troubleshoot effectively, adopt a methodical approach instead of tweaking variables at random. Always start from the observed symptom, work back to the likely cause, then test one hypothesis at a time. Take a common case: a webhook that never fires. The symptom is clear, but the possible causes are many — a wrong WEBHOOK_URL, a reverse proxy that does not forward the right path, or a firewall blocking port 443. The right method is to isolate: first test the webhook URL from your own machine with curl, watch whether the request reaches the container in the logs, and only then adjust the suspect variable. This progression prevents stacking several changes and losing track of which one fixed — or worsened — the problem.
If the container restarts in a loop, run docker compose logs --tail=100 n8n to capture the fatal message before the next restart. For database connectivity issues, check that the postgres service is healthy with docker compose ps and that the credentials in your .env match those used by the n8n service. A surprising number of "broken" instances are simply a typo in a password or a stale environment variable that a docker compose up -d --force-recreate resolves instantly.
Production-ready checklist for n8n with Docker
Before opening your instance to the world, validate these points:
- PostgreSQL used as the database (not SQLite)
-
N8N_ENCRYPTION_KEYset and backed up off-server - Port 5678 bound to
127.0.0.1, never exposed directly - HTTPS reverse proxy operational (Caddy, Nginx or Traefik)
-
N8N_SECURE_COOKIE=trueandN8N_PROXY_HOPSset - Firewall active (22, 80, 443 only)
- Automated daily backup (database +
datafolder) - n8n image pinned to a specific version
- Execution retention configured (
EXECUTIONS_DATA_MAX_AGE) - Restore procedure tested at least once
Conclusion
You now know how to install n8n with Docker in production-grade conditions: a clean docker-compose.yml with PostgreSQL, well-managed environment variables, an HTTPS reverse proxy, reliable backups, an update strategy without data loss, and queue mode to absorb load. This solid foundation is 100% yours — data, cost and scalability included.
If you remember only three reflexes, let them be these: set and back up the encryption key so you never lose access to your credentials, expose only what is strictly necessary behind an HTTPS reverse proxy, and back up before every major update so you can roll back. The rest — queue mode, execution retention, network hardening — is built progressively, in step with how heavily your automations scale. Start simple, but start well: an instance configured correctly from day one will save you hours of debugging later. And keep in mind that self-hosting is a maintenance commitment as much as a gain in control: a few minutes of regular upkeep beat an emergency restore.
The next step is to put that instance to work and truly automate your operations. To learn how to build advanced agents and workflows, follow our complete n8n AI Agent guide, and to frame your budget, compare the n8n and Make automation prices in 2026. If you would rather delegate deployment and supervision, the BOVO Digital team offers a full n8n & Make automation service.
Tags
FAQ
What is the difference between n8n cloud and n8n Docker?
n8n cloud is hosted by n8n.io with a monthly subscription. n8n Docker is self-hosted on your own VPS, free for the Community Edition, with full control over your data. The source code is identical.
How much RAM do I need to run n8n Docker?
Minimum 1 GB RAM for a light instance. For complex workflows with AI agents, 2-4 GB is recommended. With PostgreSQL included, add about 512 MB. In queue mode with several workers, plan for more: each worker consumes its own memory, and 8 GB is a comfortable baseline for an instance under heavy load.
Can I use SQLite instead of PostgreSQL with n8n Docker?
Yes, SQLite is the default database if no DB_TYPE variable is set. For production, PostgreSQL is strongly recommended for performance and reliability at scale.
How do I migrate my workflows from n8n cloud to n8n Docker?
In n8n cloud, export your workflows as JSON (Settings > Download your data). On your Docker instance, import them via Settings > Import from file. Credentials must be reconfigured manually.
Should I set N8N_ENCRYPTION_KEY manually with Docker?
Yes, it is strongly recommended in production. If the variable is not set, n8n generates a random key and stores it in the .n8n/config file. By setting it explicitly and backing it up, your credentials remain decryptable after a reinstall or a migration to another server. If you lose it, you must manually re-enter every credential of every workflow; if it leaks into a public repository, an attacker can decrypt your vault. Keep it out of Git, in a secrets manager.
Ready to implement this?
Book a free 30-min strategy call with our experts
We'll analyze your situation and propose a concrete action plan.
William Aklamavo
Web development and automation expert, passionate about technological innovation and digital entrepreneurship.


