
Tutorial: Deploy an AI Agent with MCP on Your Server in 20 Minutes
The Model Context Protocol (MCP) is the standard connecting AI to real-world tools. This step-by-step guide shows you how to create an MCP server, connect it to Claude, and automate complex tasks.

Updated

Tutorial: Deploy an AI Agent with MCP on Your Server in 20 Minutes
An LLM without tools is a brain without hands. MCP gives it both.
Deploying an MCP AI agent means giving a language model the ability to act: read a database, write a file, call an internal API, or trigger a deployment. The Model Context Protocol (MCP) is becoming the universal standard for this connection between AI and your systems. Adopted by OpenAI, Anthropic, and Google, it turns a simple chatbot into an assistant that moves from words to action.
In this tutorial, we'll build an MCP server step by step, connect it to an agent, choose the right transport, host it cleanly, secure it, and test it. The goal: that you leave with a repeatable method to put an MCP AI agent into production, not just a throwaway demo.
What is MCP and why deploy an MCP AI agent?
Think of MCP as a universal adapter between intelligence and action. Before it, every integration between an LLM and a tool required custom, fragile, non-reusable code. MCP standardizes that dialogue: a server exposes capabilities, a client discovers and invokes them. The same mechanism works for Claude, for a home-grown agent, or for n8n.
The difference is radical. Without MCP, your AI only reads and generates text: it is cut off from the real world. With MCP, it queries your database, creates files, sends emails, updates a Jira ticket, or triggers a pipeline. Deploying an MCP AI agent means crossing that boundary between conversation and execution.
The protocol relies on three complementary roles that you must clearly distinguish before writing a single line of code. Understanding who does what prevents 80% of beginner mistakes.
Client, server, tools: who does what?
The MCP client lives inside the application that hosts the LLM: Claude Desktop, a compatible IDE, an n8n agent, or your own application. It opens the connection, requests the list of available capabilities, and forwards the calls decided by the model.
The MCP server is the component you write. It exposes three main categories of primitives: tools (functions the LLM can execute, like reading a file or querying an API), resources (read-only data the model can consult, like a document or a table), and prompts (reusable message templates). In most cases you'll start with tools, because they are what enables action.
The LLM, finally, is the reasoning brain. It never touches your systems directly: it decides which tool to call and with what arguments, and then the MCP client actually performs the call. This separation is good news for security, because it places a control layer between the model's decision and the action on your data.
An exchange always follows the same cycle. Discovery: the client connects to the server and discovers the available tools. Decision: the LLM analyzes the user request and picks the right tool. Invocation: the client executes the tool with the generated parameters. Execution: the server processes the request, be it a database access, an API call, or a file read. Response: the result flows back to the LLM, which integrates it into its natural-language answer.
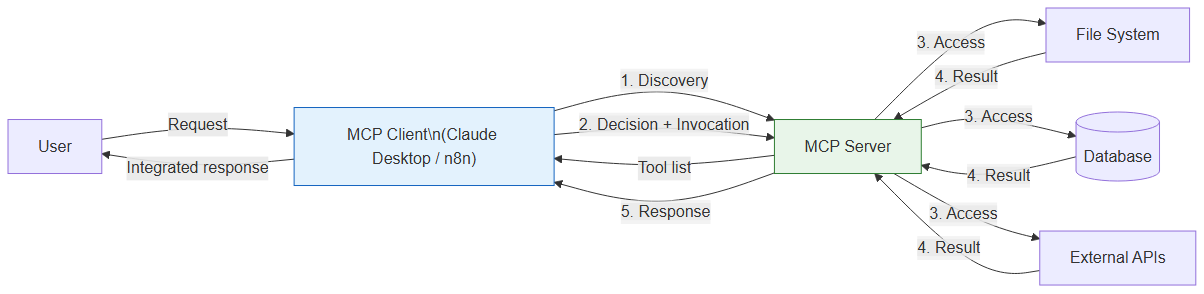 Model Context Protocol architecture diagram: MCP Client → MCP Server → File System, DB and APIs
If you want to dive deeper into building a complete server in TypeScript, our dedicated guide Build an MCP server in TypeScript in 30 minutes details the project structure and coding best practices. This article focuses instead on deploying and productionizing an MCP AI agent.
What do you need to deploy an MCP AI agent?
The prerequisites are deliberately light. The MCP ecosystem was designed to be accessible, and you don't need a cluster or heavy infrastructure to get started. Here are the essentials.
You need Node.js 20 or higher, since the official SDK relies on modern platform features, along with a package manager (npm or pnpm). A code editor like VS Code makes the experience smoother, especially to benefit from TypeScript autocompletion. Finally, to test the full integration with a model, a Claude API key or the Claude Desktop app is enough, but it is not required to validate the server itself.
One last prerequisite is less technical but just as important: a clear idea of what your agent should accomplish. An MCP server that exposes twenty poorly defined tools is harder to use than one exposing three perfectly described ones. The quality of your tool descriptions directly conditions the LLM's ability to use them correctly.
How do you connect an agent to an MCP server?
Connecting an agent to an MCP server happens in three stages: initialize the project, write the server, then wire it to the client. Let's walk through each.
Start by creating the project and installing dependencies. The official SDK @modelcontextprotocol/sdk provides all the classes you need, and zod validates your tool inputs.
mkdir my-mcp-server
cd my-mcp-server
npm init -y
npm install @modelcontextprotocol/sdk zod
npm install -D typescript @types/node tsx
Add a tsconfig.json file for TypeScript compilation:
{
  "compilerOptions": {
    "target": "ES2022",
    "module": "ESNext",
    "moduleResolution": "bundler",
    "outDir": "./dist",
    "strict": true,
    "esModuleInterop": true
  }
}
Next, write the heart of the server in src/server.ts. This example exposes three file-manipulation tools. The key point: each tool carries a name, an LLM-readable description, a parameter schema validated by Zod, and an asynchronous function that returns the result. The description is not decorative: it is what the model reads to decide when to use the tool.
import { McpServer } from "@modelcontextprotocol/sdk/server/mcp.js";
import { StdioServerTransport } from "@modelcontextprotocol/sdk/server/stdio.js";
import { z } from "zod";
import * as fs from "fs/promises";
import * as path from "path";

// Create the MCP server
const server = new McpServer({
  name: "my-mcp-server",
  version: "1.0.0",
});

// Tool 1: List files in a directory
server.tool(
  "list_files",
  "Lists files in a given directory",
  { directory: z.string().describe("Path of the directory to list") },
  async ({ directory }) => {
    const files = await fs.readdir(directory, { withFileTypes: true });
    const result = files.map(f => ({
      name: f.name,
      type: f.isDirectory() ? "directory" : "file",
    }));
    return { content: [{ type: "text", text: JSON.stringify(result, null, 2) }] };
  }
);

// Tool 2: Read file content
server.tool(
  "read_file",
  "Reads and returns the content of a file",
  { filepath: z.string().describe("Full path of the file") },
  async ({ filepath }) => {
    const content = await fs.readFile(filepath, "utf-8");
    return { content: [{ type: "text", text: content }] };
  }
);

// Tool 3: Write to a file
server.tool(
  "write_file",
  "Writes content to a file (creates or overwrites)",
  {
    filepath: z.string().describe("File path"),
    content: z.string().describe("Content to write"),
  },
  async ({ filepath, content }) => {
    await fs.mkdir(path.dirname(filepath), { recursive: true });
    await fs.writeFile(filepath, content, "utf-8");
    return { content: [{ type: "text", text: "File written successfully." }] };
  }
);

// Start the server on the stdio transport
const transport = new StdioServerTransport();
await server.connect(transport);
Run the server locally to check it starts without errors:
npx tsx src/server.ts
If it starts silently, that's a good sign: a stdio server listens on standard input and output and waits for client messages. It "does nothing" visibly until a client talks to it. Press Ctrl+C to stop it.
The last step is wiring it to a client. Claude Desktop natively supports MCP. Add your server to its configuration file, specifying the command to launch it.
{
  "mcpServers": {
    "my-server": {
      "command": "npx",
      "args": ["tsx", "/path/to/my-mcp-server/src/server.ts"]
    }
  }
}
On macOS, this file lives in ~/Library/Application Support/Claude/claude_desktop_config.json; on Windows, in %APPDATA%/Claude/claude_desktop_config.json. Restart the app: a tools icon appears, signaling your MCP tools are available. The diagram below summarizes the full cycle of an exchange between the agent and the server, from the initial handshake to the returned result.
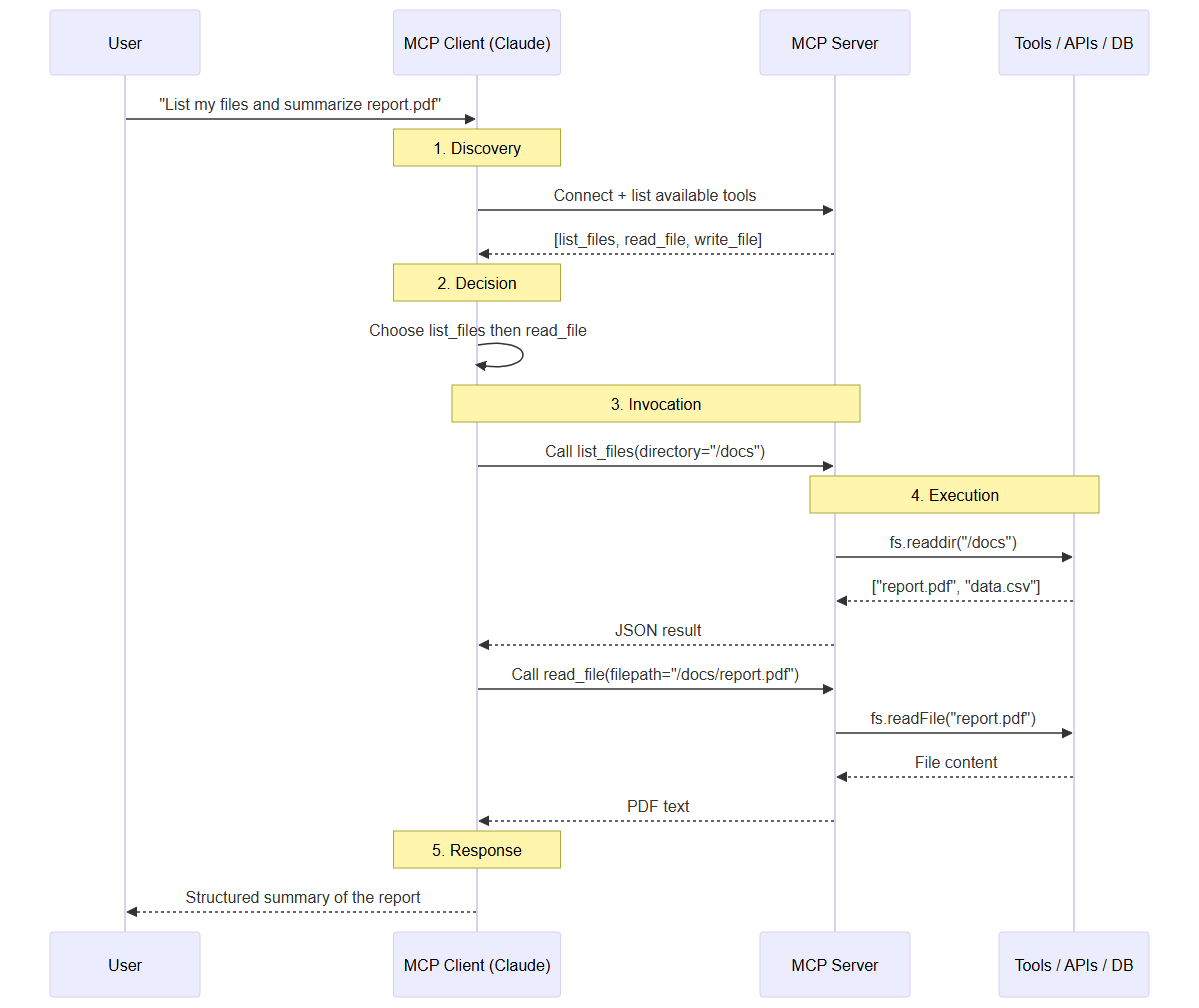 MCP sequence diagram: how the agent discovers tools, invokes them, and receives the server result
stdio or HTTP: which MCP transport should you choose?
The transport is the layer that carries messages between client and server. The MCP SDK offers two main ones, and the right choice depends entirely on your deployment topology.
The stdio transport launches the server as a child process and communicates over standard input and output. It's the simplest mode, with no network, no port, no certificate. It's perfect when client and server run on the same machine: a Claude Desktop, a local IDE, or a workstation script. Its drawback is its reach: a stdio server cannot be shared across machines.
The Streamable HTTP transport exposes the server on a network endpoint. Introduced in the March 2026 revision of the protocol specification as a replacement for the older HTTP+SSE transport, it lets remote clients connect, multiple agents share one server, and platforms like n8n call your tools over the network. It's the transport of multi-client production and distributed architectures. In return, it requires handling authentication, HTTPS, and network exposure — all topics we cover below.
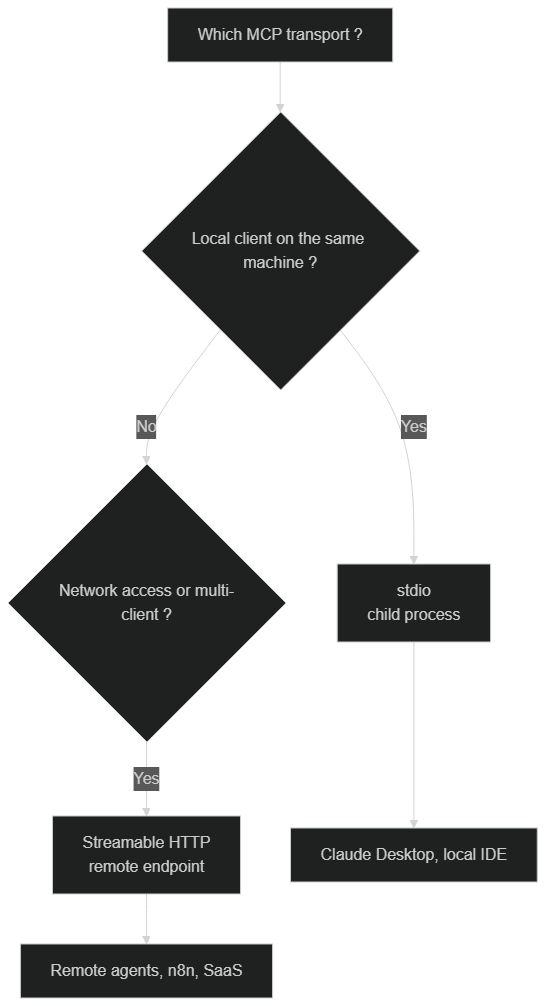 Choosing the MCP transport: stdio for local, Streamable HTTP for remote and multi-client
The decision rule is simple. If your agent and server live on the same machine, stdio is the default choice: smaller attack surface, less configuration. As soon as you must serve remote clients, share the server across teams, or call it from an orchestration platform, switch to Streamable HTTP. Many teams start with stdio to prototype, then migrate to HTTP when it's time to deploy an MCP AI agent in production.
How do you host and deploy an MCP server in production?
Going from local prototype to a reliable production setup follows a proven path. The guiding idea: freeze the environment, isolate execution, expose over HTTPS, and automate restarts. The diagram below illustrates the four tiers of this journey.
 Deployment journey: local dev → Docker image → hosting → HTTPS reverse proxy → connected agent
The first step is to containerize the server. A container guarantees that the Node version, dependencies, and configuration are identical locally and in production, eliminating the whole class of "works on my machine" bugs. Here is a simplified example Dockerfile for an MCP server using the HTTP transport:
FROM node:20-alpine
WORKDIR /app
COPY package*.json ./
RUN npm ci --omit=dev
COPY . .
RUN npm run build
EXPOSE 3000
CMD ["node", "dist/server.js"]
The second step is the choice of hosting. A classic VPS, a managed container platform like Cloud Run, or a Kubernetes orchestrator all work. The decisive criterion is not raw power — an MCP server is generally lightweight — but the ability to handle restarts, logs, and secrets cleanly. For a first deployment, a VPS with a process manager is more than enough.
The third step, essential as soon as the HTTP transport is involved, is setting up an HTTPS reverse proxy (Nginx, Caddy, or Traefik). It terminates TLS, manages the certificate, and exposes your server on a clean domain. Never expose an MCP server over plain HTTP on the internet: tool calls can carry sensitive data, and the absence of encryption makes them interceptable.
A fourth, often overlooked step is resilience. A production MCP server must survive crashes and reboots. Wrap it in a process manager or rely on your platform's restart policy so that a failed process comes back automatically. Add a lightweight health-check endpoint that returns the server status, and point your hosting platform's probe at it: an unhealthy instance is then replaced or restarted before it degrades the agent experience. Treat the server as a long-lived service, not a script you launch by hand, and your deployment will weather the inevitable failures gracefully.
How do you manage environment variables and secrets?
An MCP server almost always needs secrets: a third-party service API key, a database connection string, an access token. The absolute rule is to never hard-code these values in the source nor commit them. Load them from the environment.
const dbUrl = process.env.DATABASE_URL;
const apiKey = process.env.THIRD_PARTY_API_KEY;

if (!dbUrl || !apiKey) {
  throw new Error("Missing required environment variables: DATABASE_URL, THIRD_PARTY_API_KEY");
}
Locally, a .env file ignored by Git does the job. In production, prefer your platform's secrets manager (encrypted variables, a secrets vault) over a clear-text file. The presence check at startup, as in the example above, prevents a server from booting into an inconsistent state and failing mysteriously on the first tool call.
How do you secure an MCP server?
Giving an LLM the ability to act on your systems is powerful, but great power calls for great caution. Securing an MCP AI agent is not just a password: it is built in layers, each filtering a category of risk. The next diagram shows the path a tool call should travel before reaching your data.
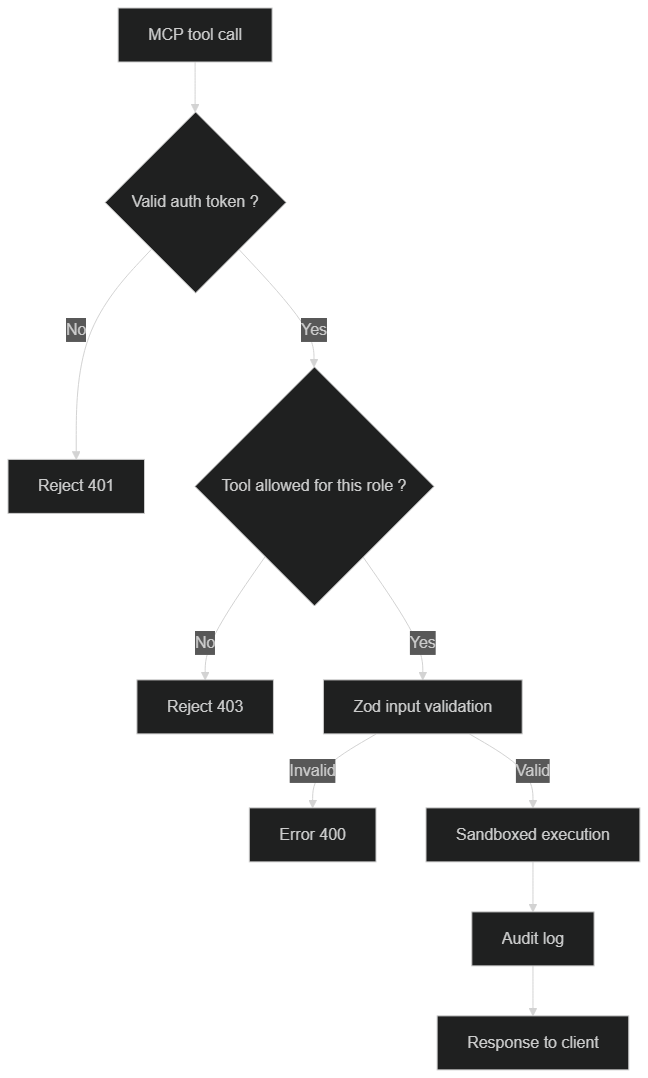 Securing an MCP server: authentication, per-tool permissions, Zod validation, sandbox, and audit log
The first layer is authentication. For a server exposed over HTTP, require a token on every connection. The MCP specification builds on OAuth 2.1 for advanced scenarios, but an application token verified at the entrance is already enough to keep out anonymous access. A call without a valid token must be rejected before it even reaches business logic.
The second layer is the principle of least privilege, applied tool by tool. Not all users should be able to invoke all tools. A read tool is harmless; a tool that deletes records or triggers a deployment deserves an explicit permission. Design your tools with the worst case in mind: if the LLM hallucinates and calls this tool with bad parameters, what is the impact?
The third layer is input validation with Zod. The schema you declare for each tool is not just a typing convenience: it's a safeguard. It guarantees a file path is indeed a string, that an identifier matches the expected format, and it rejects any malformed input before execution. Never blindly trust the arguments generated by a model.
The fourth layer is isolation. Run your MCP servers in containers with restricted permissions, never expose the file system root, and limit outbound network access to what is strictly necessary. A server compromised inside a sealed container does far less damage than one launched with the main user's rights.
The fifth layer, finally, is audit logging. Record every tool call with its timestamp, parameters, and result. These logs are essential for debugging, but also for compliance: they answer the question "what did the agent do, when, and with what data?". This traceability is often a regulatory requirement as soon as personal data is involved.
How do you test an MCP server with the Inspector?
Before connecting your server to a real LLM, test it with the MCP Inspector, the protocol's official debugging tool. It avoids wasting model calls only to discover a tool crashes on a mistyped parameter.
npx @modelcontextprotocol/inspector npx tsx src/server.ts
The Inspector opens a web interface that connects to your server, automatically lists all exposed tools, resources, and prompts, and lets you invoke them manually with the parameters of your choice. You see in real time the request sent and the raw response returned. It's the equivalent of a Postman for MCP: an isolated playground where you validate each capability's behavior before handing it to an agent.
Make it a habit to test every new tool in the Inspector before anything else. Check the nominal cases, but also the edge cases: a nonexistent path, an empty parameter, an out-of-bounds value. A tool that returns a clean, explicit error is far more useful to an LLM than one that crashes with a cryptic exception.
How do you observe and debug an MCP AI agent in production?
Once in production, you can no longer just watch the console. Observability becomes your best ally for understanding what the agent does and why it sometimes fails.
Structure your logs as JSON rather than free text: each line becomes processable by an analysis tool. Log at minimum the name of the called tool, the execution duration, the status (success or failure), and a correlation identifier to link calls from the same conversation. With this information, you quickly spot slow tools, abnormal failure rates, and unexpected usage patterns.
Also monitor server-side errors distinctly from business errors. A database connection that drops does not have the same cause or treatment as an invalid parameter. By separating these two families in your logs and metrics, you diagnose faster. For critical deployments, an alerting system on error rate or latency warns you before users complain.
On the debugging side, keep the Inspector within reach even in production: pointed at a staging environment that reproduces your real configuration, it remains the fastest tool to reproduce a tool bug. And when an agent behavior surprises you, trace the chain back: was it a bad LLM decision, a poorly described tool, or a genuine execution error? The answer guides the fix.
What concrete use cases exist for an MCP AI agent in business?
Theory makes full sense against real usage. A well-designed MCP server becomes the bridge between conversational AI and the company's information system.
The first major use case is access to internal data. By exposing read tools on a database or data warehouse, you let an agent answer business questions in natural language — "who are the ten most active customers this month?" — without a human writing the SQL query. Read tools, being low-risk, are an excellent starting point to deploy an MCP AI agent safely.
The second use case is action automation. Creating tickets, updating CRM records, sending notifications, triggering workflows: each action becomes a tool. Paired with an orchestration platform, the agent no longer just answers, it executes. This is precisely where the n8n and MCP combination shines, as we detail in Connect n8n to an MCP server for your AI agents. n8n brings orchestration, MCP brings tool access, and the LLM brings reasoning.
The third use case, more advanced, is agent interoperability. As organizations deploy multiple specialized agents, the need to make them collaborate emerges. MCP, combined with protocols like A2A, sketches a future where agents exchange capabilities and context in a standardized way — a topic we explore in MCP, the A2A protocol, and AI agent interoperability.
You can also connect several MCP servers to a single client, each specialized in a domain: one for the file system, one for the database, one for the CRM. The agent then freely composes these capabilities. And to avoid reinventing everything, know that ready-to-use community MCP servers already exist for Slack, GitHub, PostgreSQL, and Notion.
Conclusion: your roadmap to deploy an MCP AI agent
MCP is the piece that turns generative AI into agentic AI. You now know how to build a server, distinguish the client from the server and the tools, choose between stdio and HTTP transports, host your service cleanly behind an HTTPS reverse proxy, manage your secrets, secure each call in layers, test with the Inspector, and observe everything in production.
The best way to progress is iterative. Start small, locally, with two or three read tools over the stdio transport. Validate them in the Inspector. Add authentication and switch to HTTP the day a remote client must connect. Containerize, add audit logs, then progressively open action tools as your confidence grows. It is this discipline, more than technical complexity, that separates a production MCP AI agent from a fragile demo.
To go further and orchestrate your agents without a superfluous line of code, explore how to turn your n8n workflows into intelligent systems.
Want a custom MCP server for your business? At BOVO Digital, we build personalized MCP servers that connect your AI to all your internal systems. Automation + Intelligence = Productivity.
Tags
FAQ
Do I need a paid account to deploy an MCP AI agent?
No. The official @modelcontextprotocol/sdk is open-source and free, as are the MCP Inspector and Node.js. You can build, test, and host an MCP server at no cost. Only calling a commercial LLM (Claude, GPT) or using managed hosting may incur charges, but free alternatives exist at every step.
What is the difference between the stdio and HTTP transports in MCP?
The stdio transport has the client and server communicate through the standard input and output of a locally launched child process: ideal for Claude Desktop or an IDE on the same machine. The Streamable HTTP transport exposes the server on a network endpoint, letting remote agents, n8n, or multiple clients connect to it. Choose stdio for local, HTTP for remote and multi-client setups.
How do I secure an MCP server exposed on the internet?
Apply the principle of least privilege, validate every input with Zod, require an authentication token (OAuth 2.1 or a token), restrict permissions tool by tool, run the server in an isolated container behind an HTTPS reverse proxy, and log every tool call for audit. Never expose the file system root or any secret in clear text.
How do I test an MCP server before connecting it to an agent?
Use the official MCP Inspector with the command npx @modelcontextprotocol/inspector. This tool opens a web interface that lists your tools, resources, and prompts, and lets you invoke them manually with test parameters. It is the best way to validate your server before exposing it to an LLM.
How long does it take to deploy a working MCP AI agent?
The skeleton of a local MCP server connected to Claude Desktop takes about 20 minutes. A full production deployment, with HTTP transport, authentication, containerization, and observability, usually takes anywhere from a few hours to a day depending on your environment and security requirements.
Ready to implement this?
Book a free 30-min strategy call with our experts
We'll analyze your situation and propose a concrete action plan.
William Aklamavo
Web development and automation expert, passionate about technological innovation and digital entrepreneurship.


